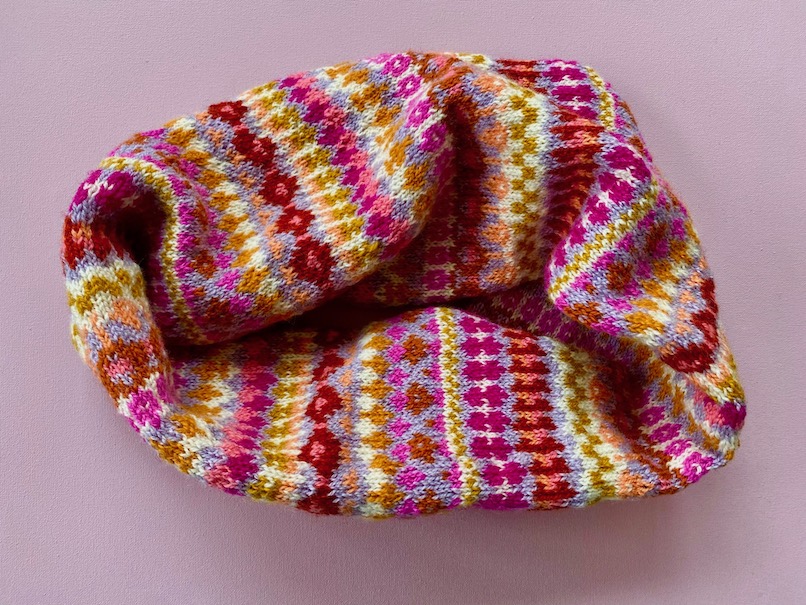
Lately, I’ve been a bit obsessed with knitting cowls in stranded knitting. They are easy projects with a good stretch of nice straightforward knitting, enough that it’s now one of those projects that are done just when you get started. I knit cowls by knitting in the round until the piece is long enough, around a meter, then twisting one end 180 degrees and sewing the two ends together. The resulting cowl has a very nice drape around the neck, fits loosely, and can be formed to drape as you like it. And, it’s a good way to try out a color pattern to see what it looks like one a bigger surface.
Here, I’ll show you how I sew a cowl together. I am using my Memory Cowl to show this step, the pattern for this will be published when the pattern is finished and has been tested (if you are interested in being notified when I have a test, you can sign up here). Memory Cowl is a relative of Memory Vest, and you can read the story about that pattern here. Both patterns are based on a child’s vest my grandmother, Judith Harvest, knitted in the mid-1970’s.
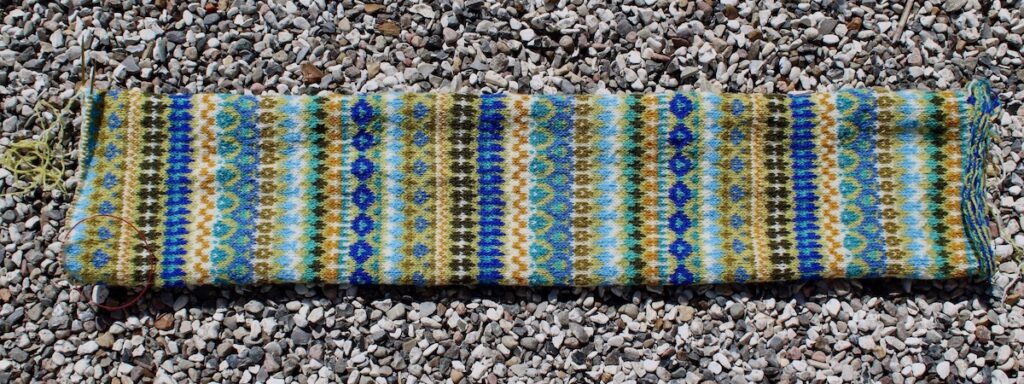
I cast on using an ordinary long-tail cast on, then just knit in the round according to the diagram until the cowl looked like this:
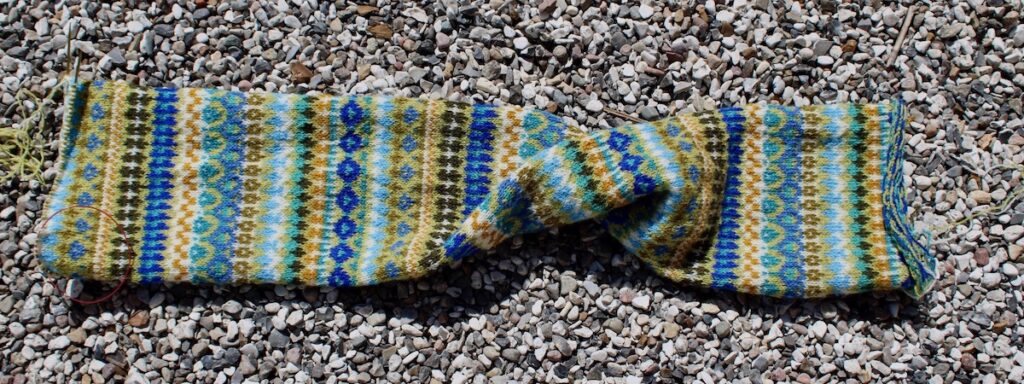
Then, I twist one end 180 degrees:
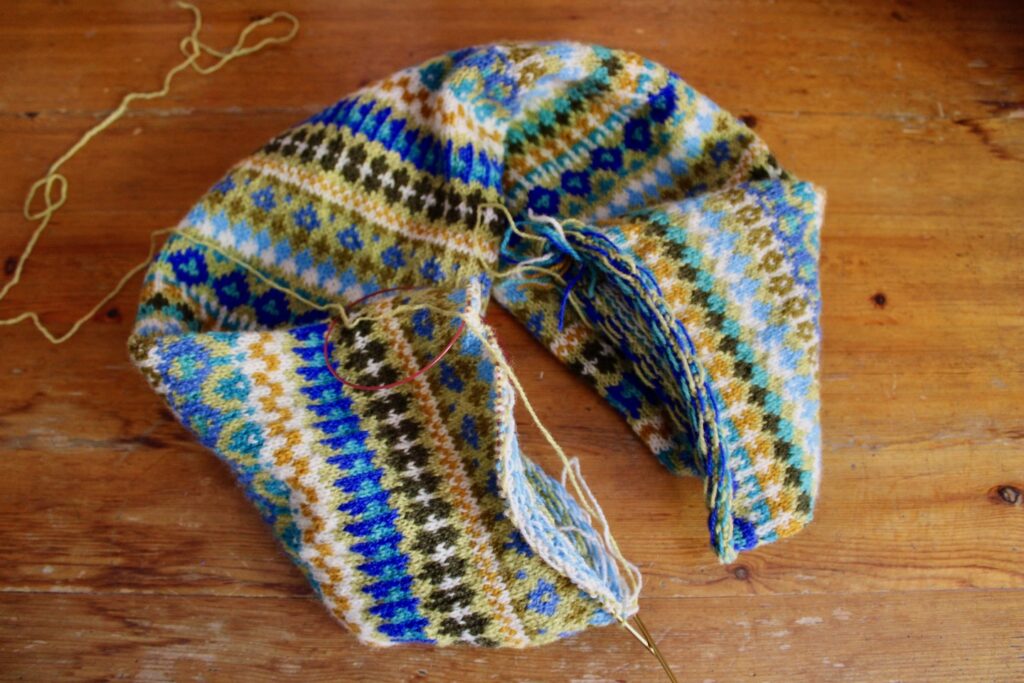
And this is what it looks like with the 180 degree twist and the ends brought together, ready to sew:
I sew using a kind of grafting that I found by improvising. It’s a way to graft the open, live stitches on to the cast on edge. I find this technique a lot easier than true graftign, where both sides have live stitches.
The way I do it is as follows, and is also shown in the video below:
Sew from back to front through the live stitch
Sew through both “legs” of the stitch on the other edge. Note that I sew into the stitches of the first stranded knitting round, not the one-color round as that is the cast on
Sew into the live stitch from the front and drop it from the needle
Repeat for all stitches (and you may find a nice rhythm where sew from the front-drop stitch-sew from the back becomes one motion).
I don’t worry about correct tension as I sew – after some stitches, I go back and pull the yarn so the tension is correct, and after that is done, the seam becomes quite invisible.
When all stitches are sewn together, sew in the end and the project is done.
PS: Sorry about my garden hands. I scrubbed them but they still look quite interesting. But hey, at least it’s not as distracting as those knitting videos with long brightly colored fake nails, I think!
This April, the summer issue of PieceWork Magazine is about samplers, and contains an article about Anna Næsgaard, written jointly by our textile work group at the Textile Museum in Herning, Denmark. A small excerpt is available here. We are very happy with the article we wrote, and it works so well in the context of this interesting issue of PieceWork.
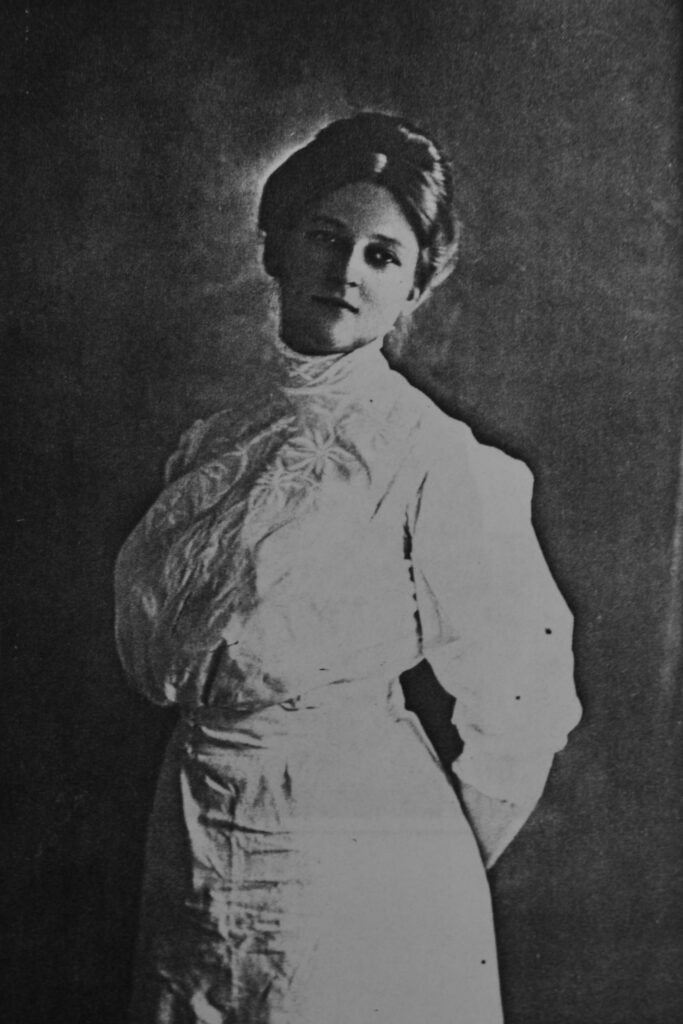
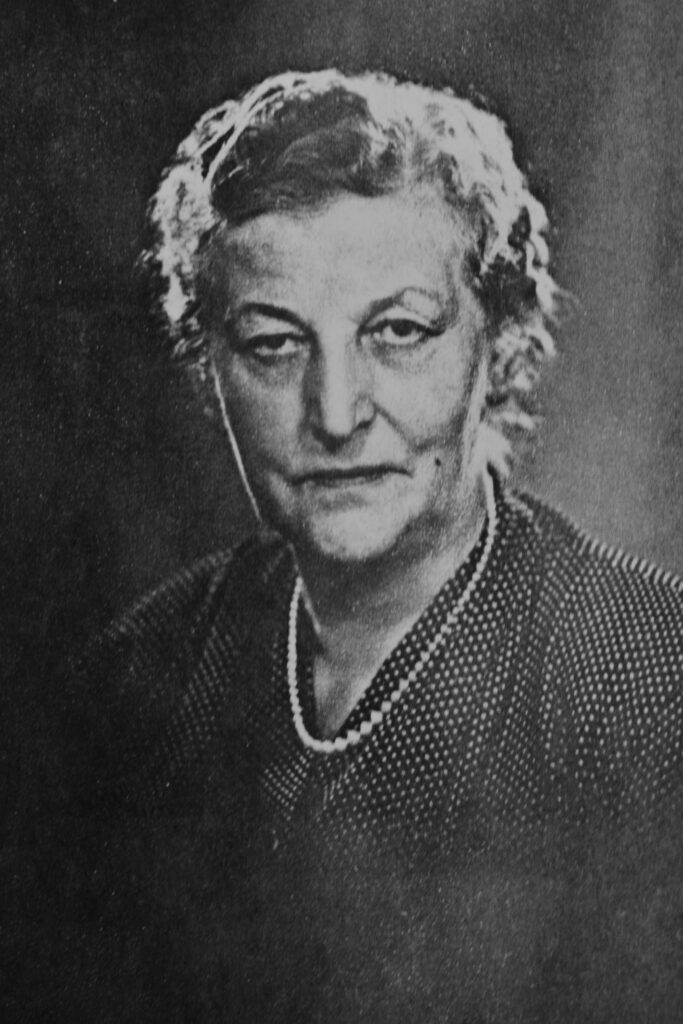
Anna Næsgaard (1885-1975) was an influential person in Danish needlework education, working for many years as an inspector of needlework education in the Copenhagen school system. That meant she participated in defining the content of the classes, and was in charge of a collection of needlework that teachers could borrow and use as inspiration. You can of course read about all this in the PieceWork article.
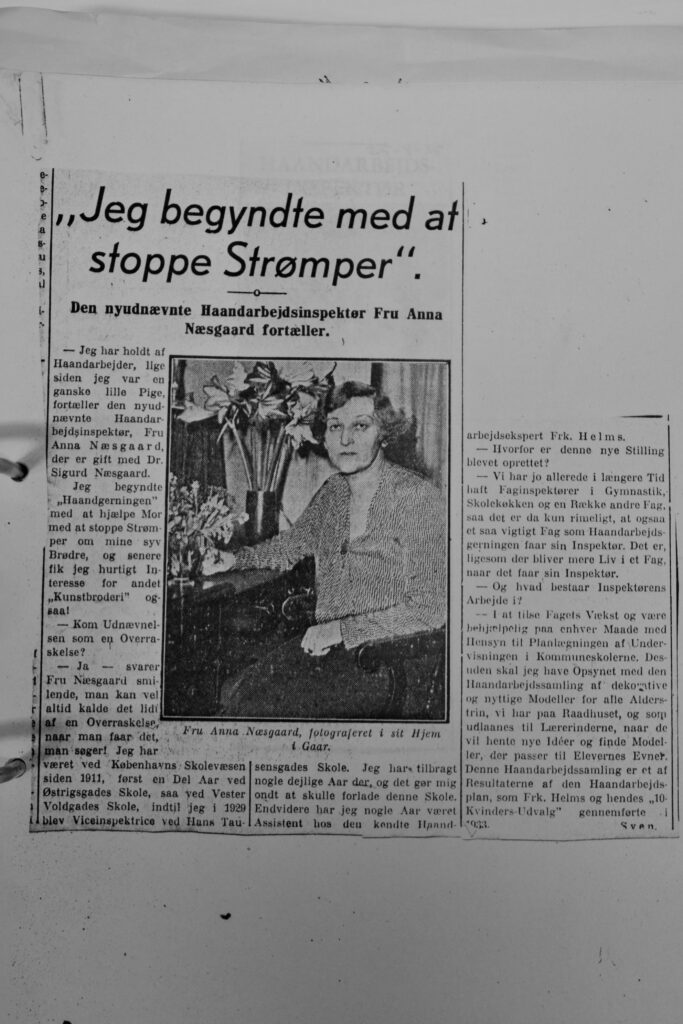
Anna Næsgaard as a young woman and in later years. Photocopies of photographs and a photocopy of a newspaper article about Anna Næsgaard. All in the collection of the Textile Museum in Herning.
Today, Anna Næsgaard’s extensive personal collection of needlework is a part of the collection of the Textile Museum in Herning, Denmark. We have studied some of the many objects in the collection that contains knitting, crochet, sewing, mending, tatting, samplers and so on. The collection contains objects that Næsgaard probably collected out of personal interest, but also many objects that are directly connected to formal needlework education.
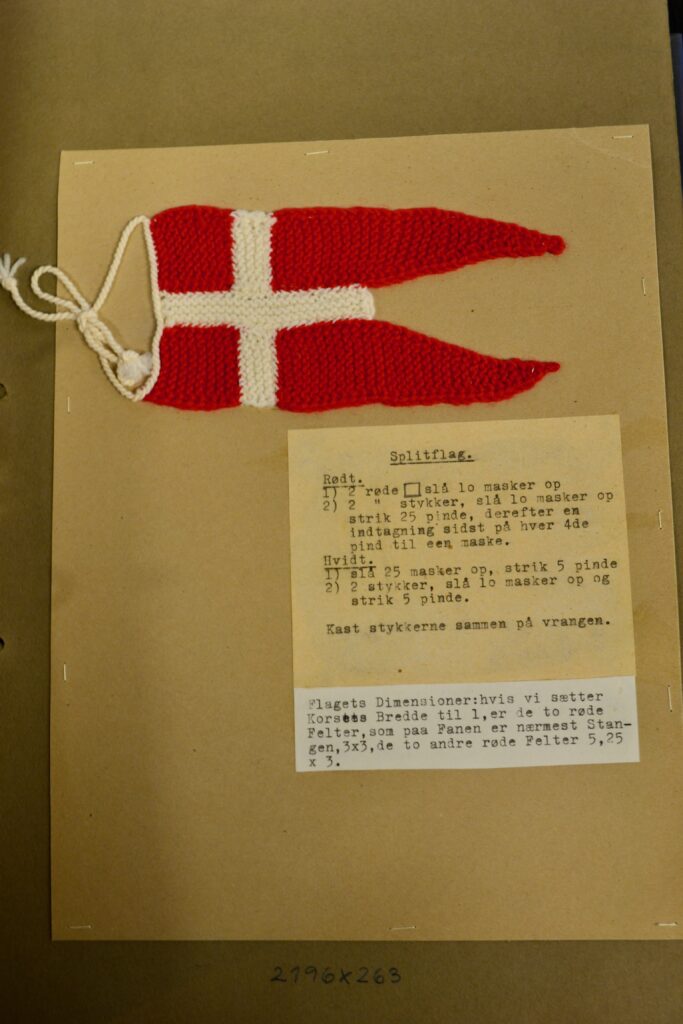
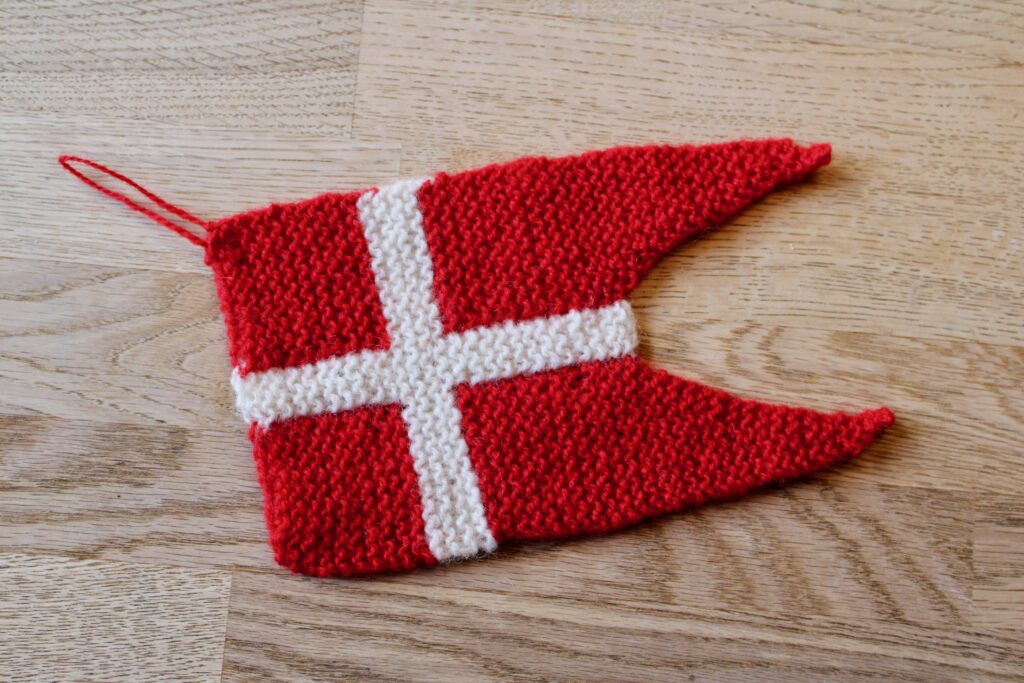
To celebrate the publication of our article in PieceWork, I’ve chosen to focus on a single object from Anna Næsgaard’s collection, a small Danish flag called a split flag (because of its split tails, traditionally only used by the King/Queen). This flag is a pattern from needlework education, knitted in 7 pieces and sewn together. A lot of practice of sewing knitted pieces!
A page from one of many binders in the collection of Anna Næsgaard.
I actually made one flag according to the original pattern described above. It did not turn out very nicely! So I have made a new version using intarsia, which is much easier to give a nice finish. Here is the intarsia version:
Danish Flag in Intarsia
Danish flag, i used Rauma Finull and 2,5 or 3 mm needles.
Cast on 10 stitches with red yarn, 3 with white yarn, then 10 with red yarn (use another skein or the other end of the same one as before).
Knit 19 rows of 10 red, 3 white, 10 red stitches. Cross the yarns on the wrong side at every color change. The last row is on the wrong side, and there are now 10 garter ridges on the right side.
Break the yarns, attach the white yarn at the right side and knit 8 rows. The last row is on the wrong side, and there are now 4 garter ridges on the right side.
Again, attach red, white, and red yarn, knitting 10 red, 3 white, 10 red stitches crossing the yarns on the wrong side at every color change. Knit 24 rows. The last row is on the wrong side, and there are now 12 garter ridges of red/white/red pattern.
Knit the first 10 red stitches, bind off the white stitches and break the white yarn, then knit the last 10 red stitches.
Finish the two sides of the flag separately, one at a time or at the same time.
Left side (on the right side of the work)
Knit 10 stitches on the wrong side
Now, repeat the following two steps until 3 stitches remain:
knit until 3 stitches are left, slip two stitches knitwise one at a time, the knit them together throught the back loop
knit 3 rows
Knit one, slip two stitches knitwise one at a time, the knit them together throught the back loop. Knit 3 rows. Slip two stitches knitwise one at a time, the knit them together throught the back loop, break the yarn and pull it through.
Right side (on the right side of the work)
Knit 10 stitches on the wrong side
Now, repeat the following two steps until 3 stitches remain:
knit one, knit two together, knit the rest of the row.
knit 3 rows
Knit two together, knit one. Knit 3 rows. Knit two together, break the yarn and pull it through.
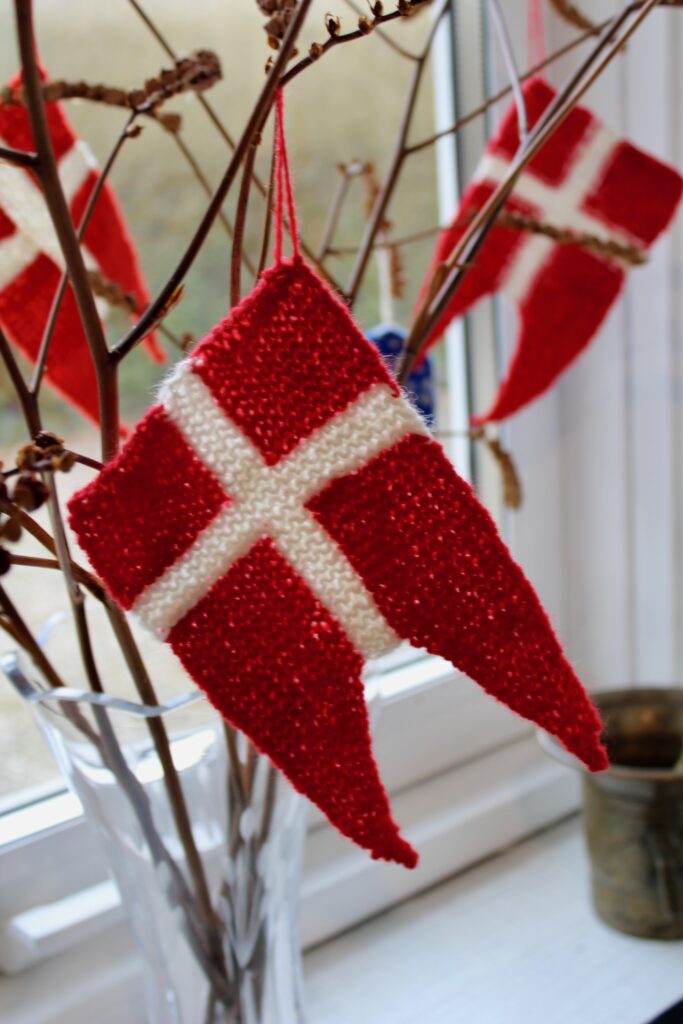
Weave in all ends and make a loop at the corner so the flag can hang. Here, I decorated some branches with flags, and I do think it looks quite festive:
It is always a bit festive to release a new knitting pattern, I think. Especially when I have worked on the pattern for a long time, as I have with the pattern for the Walker 1_44 Sweater. I knitted my first version of the sweater during corona lockdowns. After that, the process of editing, photopraphy, and test knitting is always long, but this pattern was honestly also delayed because it was stuck on my to-do list with things that were not to be postponed!
But, about the finished pattern:
Walker 1_44 is a basic sweater with a relaxed body fit and a relatively fitted sleeve with a bit of extra length to keep wrists and hands warm, too.
The sweater is knitted from the bottom up, and shoulder seams closed with a 3-needle bind off. Then, sleeves are worked top down.
Here, the Walker 1_44 Sweater is shown in
Rauma Finull and Mohair by Canard Brushed Lace held together, but with a gauge of 18 sts / 10 cm (4 inches), there are a lot of different yarn options for this one.
If working in just one color, I definitely think that the decorative rib edges are the best choise. But, I also wrote an option for ordinary 2×2 rib edges into the pattern. Those stitch numbers can also be used to work 1×1 or twisted 1×1 rib. If working the sweater in stripes or scraps, I think ordinary rib edges look nicer, as both colors changes and decorative rib edges just go in too many directions at once.
The decorative rib edges are partially based on the “Rick Rack Rib” from Barbara G. Walker’s “A Treasury of Knitting Patterns” and I decided to name this pattern after the author and where in her 4 volume work the rib is found: first book, page 44. Barbara G. Walker (b. 1930) is the author of several books, in addition to knitting, she has written about feminism and mythology. I became aware of Walker’s treasuries when I lived in the US from 2005 for a few years, and bought all four books. I often return to them. They are both a register of stitch patterns, collected by Walker, but are also handbooks to look in when you just need an edge pattern, an allover pattern, etc.
Walker 1_44 Sweater
Sizes:
XS (S – M – L – XL – 2X – 3X – 4X – 5X) with a finished chest measurement of 94.5 (105.5 – 116.5 – 122 – 133 – 144.5 – 155.5 – 166.5 – 178) cm / 37 1/4 (41 1/2 – 46 – 48 – 52 1/2 – 56 3/4 – 61 1/4 – 65 1/2 – 70) inches.
The pattern includes a bonus project: cuffs in the same pattern as the decorative rib. Perfect for trying out new color combinations or as a quick gift!
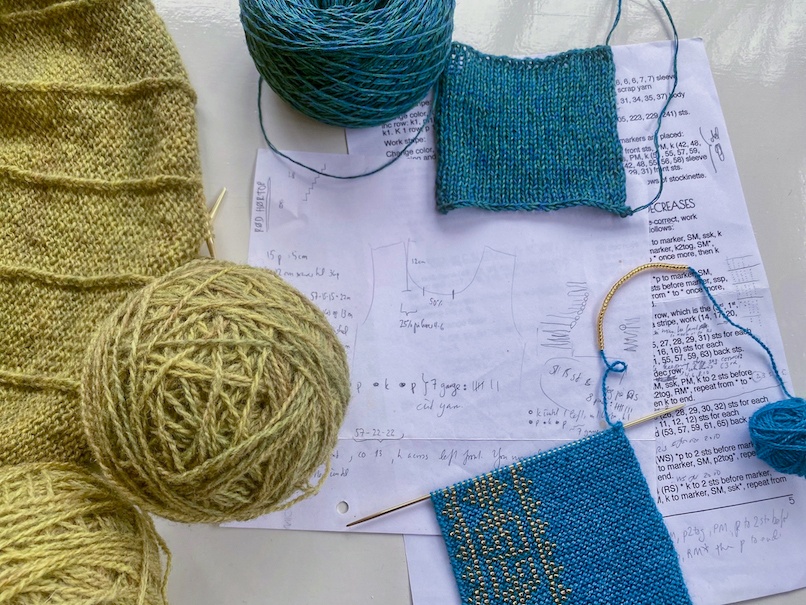
To give an idea of color combinations, 5 cuffs are shown below with the yarn they are made from:
Finull 405 dark grey and Brushed Lace 3010 charcoal:
Finull 404 grey and Brushed Lace 3005 sand:
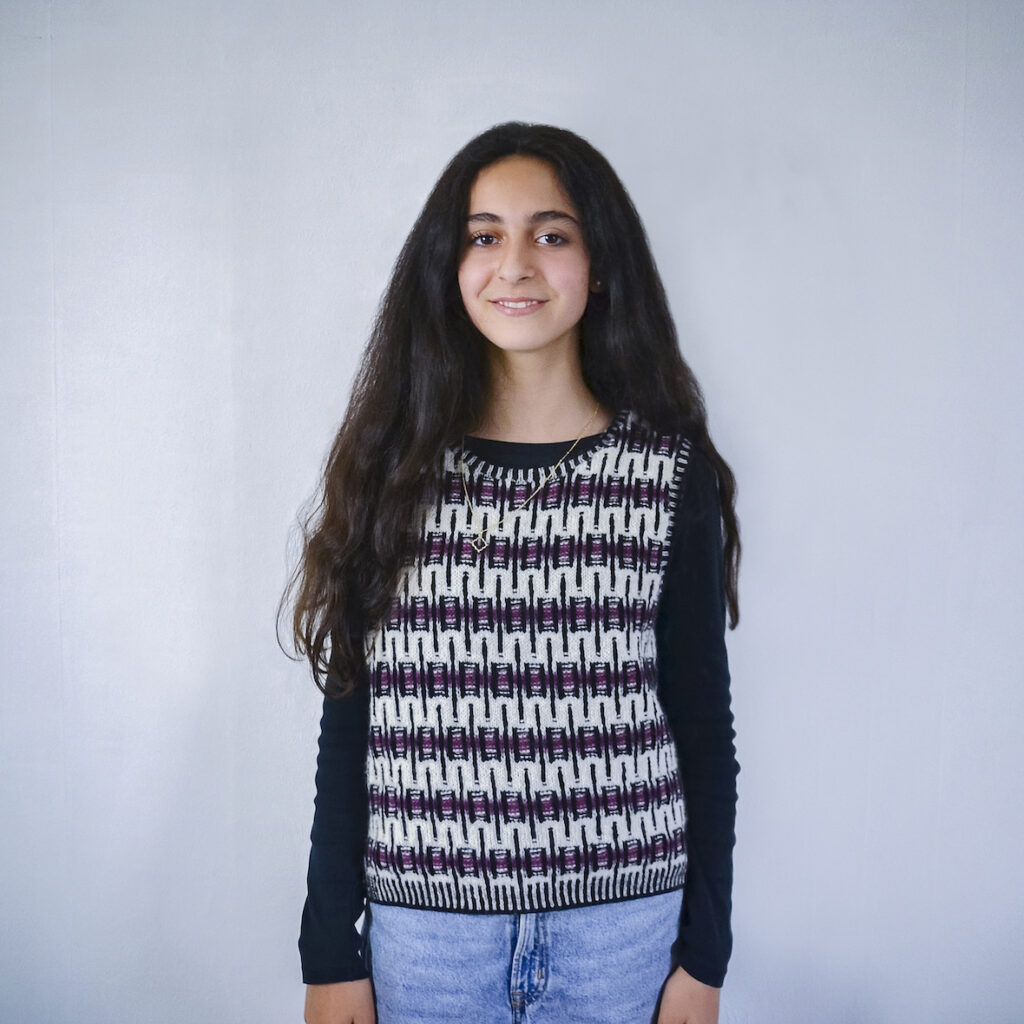
Finull 4133 light rose and Brushed Lace 3022 rustic rose; the same color combination as the pink sweater above:
Finull 4805 mustard and Brushed Lace 3034 curry:
Finull 4125 ocher heather and Brushed Lace 3034 curry; the same color combination as the yellow sweater above:
And that, of course, is just a few of the infinite number of combinations of Finull and Brushed Lace!
Another day, I’ll show pictures of other versions of the sweater, made from yarns scraps and lonely skeins.
Astrids butik is my online store and the place to find the products related to my project Retrofutura. There, you’ll also find products related to my natural dyeing page Midgaards Have – natural dyes, yarn for dyeing, and dye plant seeds. Plus, you’ll find a growing selection of other yummy yarns, notions and patterns.
Would you like to test knit? I have a constant stream of knitting patterns in development, and the work from idea to finished pattern is a long one – that the designer cannot walk alone!
That’s why I am always looking for test knitters who are willling to help me.
Every designer have their proces. Here, I’ll give you a summary of mine.
My designs start with an idea. It may come from a historical knitted object or an old photo. Or it may come from yarn that I dyed or otherwise got my hands on.
In any case, I will work with the idea physically. I don’t draw in the beginning, it’s too much work and doesn’t inspire me. I just knit, that’s what I like to do! I knit the design that I see in my head. And then I do calculations in a spreadsheet. During that phase of the design, I may also draw, but mostly to help with calculations.
When a model is finished, I’ll often wear it to see how it behaves on the body. Sometimes, I’ll knit 2 or 3 versions of a design by the time I finish with the calculations. Because I knit the first sample in my own size, which is L or XL, that size will be the design’s original scale. Smaller and larger sizes are calculated after the calculation of the first size. I believe it is a good thing that my size is in the middle of the range of sizes, so the smaller and larger sizes are not such a “long way” off – compared to designers who wear S or XS (the equivalten of a 9-10 year old size) so they will automatically think without so much body!
When I finish writing a pattern in English, I send it to my editor. She goes through all calculations and points out problems, errors, and misleading or incorrect language. When I get the pattern back, I translate it to Danish. My Danish proofreader then works through it to make sure no errors were introduced in translation, that all abbreviations are there, and she fixes the commas.
When a pattern reaches that point, 99% of problems will have been found, but it has still only been knitted by me. This is where the test knitters enter the equation.
As a test knitter, you will actually knit the pattern, so you will be able to catch vague descriptions or downright erroneous ones (if there are any, although I hope not).
I ask my test knitters to pay extra attention when reading and knitting, and I ask for feedback usually weekly and by the end of the test. For example, there will be questions about overall clarity and specific questions about gauge and how much yarn you used.
My tests are usually not secret, so you can share pictures on social media during and after the test. If the test is of a garment, I’ll be very interested in pictures where the garment is actually worn, since that will tell me how my design does on real bodies.
I am not able to pay my test knitters, but previous testers tell me that they enjoy being a part of the design process. I also offer a 10% discount if you buy yarn for the test in my shop Astrids butik but depending on where you live, this may not be a good deal for you. I do offer a free pdf pattern upon completing the test that you can choose among my published patterns.
Would you like to receive an email next time I am looking for testers for a design? Then sign up below. I will only ever send emails to this list when I am looking for test knitters:
Recomposed is a project co-created by folk musician Maja Kjær Jacobsen and myself, Astrid Colding Sivertsen. Maja was searching for a knitwear designer who is interested in creating new from the old, and that happens to be the overall theme of my own project, Retrofutura. Maja and I have been working on the project Recomposed for a while, and Maja wrote about it (in Danish) a while back on her home page. I had not written anything yet, so I decided it was time for that!
Recomposed is a project that plays out in the cross section of folk music and knitting. Our overall interest is cultural transmission – past and present. Folk musicians and knitters of the past have found their inspiration locally. A musician might learn a tune from another musician, or just copy a tune they heard. Knitting patterns were passed on in the form of samplers, but also by knitters just copying a pattern they saw. Tunes and patterns migrated, often slowly, transmitted actively and passively, mutating slowly during their migration.
Now, our senses are under constant bombardment. Everything can move over long distances with extreme speed. Explaining how mass media and social media have hypercharged curtural transmission is entirely unnecessary. That is why Recomposed focuses on finding inspiration that is nearby and old, transforming that into new music and knitting.
The idea may sound a bit airy, so we decided to bring it down to earth by choosing one specific photograph as our starting point. We chose a portrait of Roland Peter Andresen from 1895.
Evald Tang Kristensen was a Danish folklorist who was responsible for collecting a very large number of stories, folk tales, and songs (some with medieval or even older roots) by travelling by foot to speak to a large number of informants. Evald Tang Kristensen brougt the photographer Peter Olsen with him on one such journey in 1895, Olsen making the trip with an extremely heavy back pack filled with photographic glass plates. The result was a series of portraits of the poor informants wearing their everyday clothes. Many of them with some work, like knitting, in their hands. The portait series is quite unique in showing real people wearing their real clothes, as people would dress up in nicer (maybe borrowed or rented) clothes to have their portrait taken. Some of the informants attempted changing into something more presentable, but were prevented from doing so.
Roland Peter Andresen lived in an almshouse in the northern part of Denmark (Vendsyssel). He was born in Nibe in 1819, a son of itinerant people desribed by the Danish words “kæltringer” or “natmandsfolk” – derogatory terms that are hard to translate. “Kæltring” is still used, but now just means a person of low morals. An older meaning is a poor, itinerant person, not a gypsy but someone similar to the travellers of Ireland. “Natmand” is a waste collector or knacker. Someone who removes dead animals or feces.
Back to Roland’s life. His parents were arrested shortly after his birth, and he seems to have been a ward of the state. As an adult, he worked at the estate Baggesvogn where another worker taught him a large number of folk tales. Roland married and fathered 12 children, only 5 of which survived. As an old man, he lived at the almshouse, and that was where Evald Tank Kristensen visited him and heard all his tales.
The photograph of Roland can be found in the Folklore Archives at the Royal Danish Library, but har also been published, e.g. in the book “Gamle kildevæld”. A Danish language book with a hard-to-translate title. Directly translated, it means “Old fountains” meaning fountains of old myths and songs.
Left: Maja at the Royal Danish Library, written on the photograph by hand: Roland Peder Andresen, Sindal, knacker. Right: my first swatch for the Roland pattern on top of several books opened to relevant pages.
But what really catches my eye is – obviously – Roland’s sweater. It is of a type now known in Denmark as an Icelandic sweater. Two-color knitted sweaters like Roland’s were used all over Scandinavia, mostly by men, for everyday wear/workwear for the poorest people. It appears that Roland’s sweater was cut open and a fabric buttonband sewn on.
Below, I’ll go into more detail with the sweater type. Another day, I’ll write about the process Maja and I used to work with the sweater’s color pattern in knitting and folk music form.
The Icelandic sweater originates in the Faroe Islands, and the name “Icelandic” may just mean “coming from an island”. Or – as suggested here – the sweaters may have been traded from the Faroe Islands to Denmark via Island. The Faroe Islands (Faroe meaning sheep, so the sheep islands) produced wool and finished knits, and those were the most important trade goods for hundreds of years.
Knitting arrived in the Faroe Islands in the 16th century, and sock production quitckly grew. Socks were the first big export article for the Faroe Islands, selling more than 100,000 pairs per year around 1770, equivalent to 98 % of total export. During the 18th century, sock production fell and sweater production increased. It is not known when color patterning of sweaters began, but it was common by the end of the 18th century. The source for this information is a book by Svanhild Strøm and Marjun Biskopstø, the Danish version is “Færøsk strikkebog”. There is a book by the same authors in English, “Faroe Island Knits”, but it doesn’t seem to be the exact same book.
Import of wool sweaters from the Faroe Islands to Denmark was controlled by a trade company run by the Danish state. In a move to counter falling quality, the trade company published instructions in 1833, defining the weight, dimensions, and patterns of the sweaters. The instruction is reproduced in Annemor Sundbø’s “Koftearven” (the English “Norway’s Knitted Heritage” is the translation of this book, I believe) and is given in a very dull and formal tone. But the main point of the instruction is this: any color pattern was permitted, as long as the floats on the back were not over more than 4 stitches. The light main color is not mentioned, but the dark pattern color is clearly defined: the yarn must be dyed with korkje, a red dye extracted from the rock lichen Ochrolechia tartarea – the darker color the better. Only in regions where no korkje grew was black patterning permitted, but not grey.
Finding historical Icelandic sweaters in Denmark is very difficult, probably because few are in existance. This is common when interested in clothing of the past: the clothing of the elite still exists. Nice clothing from middle class people may be preserved. Poor people’s ugly, worn out clothing is almost never preserved. It has been used up completely, ending its life as rags. Also, such clothing has not been seen as worth preserving.
The closest I’ve come to an older Icelandic sweater in Denmark so far is a photo in the book “Alverdens strikning” by Ann Møller Nielsen, a book about knitting around the world. You can just see the open book top right in the photo above of my swatch. The sweater belongs to the Museum at Koldinghus.
Ann Møller Nielsen describes the sweater as natural white with “a pattern of, originally, red yarn that faded with time”. The red color is not visible in the photo, but Nielsen took the photo herself, so she must have examined the sweater and seen the color. The information provided by the museum is rather brief, and even uses the photo from Nielsen’s book. But it does tell us that the sweater was found unregistered in the museum’s collection, it was cleaned in 1978, and it was used by a marine soldier. There is no information about how old the sweater may be, but it does seen to stick to the 1833 instructions with its faded red color: the dye from korkje is known to fade quickly.
Searching all Danish museum collections gives only a few hits. I can only find a few sweaters that sound like the right type, so here, here, and here, but there are no photos and they seem to be 20. century.
With so few actual sweaters left, photographs are a good source of information. Besides the photo of Roland, there are others of Danish men in Icelandic sweaters. This photo, from Bornholmernes historie by Ann Vibeke Knudsen, shows a young fisherman from the island Bornholm wearing a Icelandic sweater. The photo is taken around 1910.
Fisherman from Bornholm, ca. 1910.
The picture looks a bit staged with both hat and pipe, but the sweater looks real. The surface shows wear, and there is a sewn on neck edge made from fabric. The pattern is exactly the same as the ones on Roland’s sweater and the Kolinghus sweater.
The photos of Roland and the young fisherman from Bornholm are black & white, so we cannot quess at the pattern color. But a photo of a sweater in Sweden’s Nordiska Museum is in color, and shows red patterning.
Man’s sweater in the collection of Nordiska Museet, Sweden. Photo by Nordiska Museet CC BY-NC-ND 4.0
The description does not say if the sweater was made in the area where it was used, so there is no telling if the red coloration is complicance with the 1833 instruction (which was for trade goods) or if red just seemed a normal choice to the knitter. The sweater was used in the period 1850-1870 in Värmland by someone descibed as a “finngubbe”. I searched around to find the meaning of this word, and it turns out to be an old derogatory term for a Sami man.
All the sweaters have two things in commen. One is who wore them, the other is how the sweaters were knit and finished.
The wearers of these sweaters (whether bought or made locally) were the poorest people, the lowest ranked in their society. Knackers, travellers, finngubber, sailors, and soldiers. Annemor Sundbø shows a picture in her book of a number of inmates of al prison, all wearing “Icelandic” sweaters. At the time the above mentioned sweaters were in use – 1910 and earlier – richer or higher ranking (or even middle class) people did not wear knitwear visibly. They may have used knitted underwear or home wear but never anything knitted in public. The better off wore woven clothing.
The sweaters have many similarities. All have the exact same pattern. The fabric of all the sweaters looks well made and smooth, but the edges are another story. The sweaters from Koldinghus and Nordiska Museet have knitted edges at the wrists and lower edge, but unfinished neck openings. The young fisherman from Bornholm and Roland Andresen are wearing sweaters with sewn on fabric edges, and Roland’s sweater seems to have a buttonband, also sewn on.
The Icelandic sweater never really went away. I have found it in school photos from the 1940’s and 50’s, newspaper photos from the 1970’s, and it is still popular now. I am working on my version of this classic, and I will write about that in my next post.
Until today, I’ve run a web shop here on Retrofutura. But, there is also one on my other page, Midgaards Have, and it is really not practical. Especially since there was no way to order from both shops and pay just one freight.
So I’ve been working on the solution, and Astrids butik is finally ready now. Astrids butik is the place to order yarns and patterns previously available here at Retrofutura, and in addition all the products from Midgaards Have: patterns, yarns for dyeing, natural dyes, and seeds. And more to come.
This also means that I have closed the shop on this page. Thanks for now, and see you at Astrids butik.
Short rows are the perfect technique for shaping knitting, and there are many different ways to knit short rows. Many of them are a bit fiddly, and some will even make a small hole in the knitted fabric where the turn is. My favorite technique is German short rows because they are easy to work and the result is a nice, almost invisible, turn.
Here, I’ll show how to work German short rows in stockinette. The project I’m working on is a striped version of my own Walker 1_44 Sweater pattern that I’m currently writing. I use short rows to shape the shoulder of this sweater, to give it a small slope that makes the sweater fit better.
After knitting on the right side
Here, I am showing what to do after finishing the knit stitches on the right side. Having reached the number of stitches the pattern states, turn the work so the wrong side is facing you.
Now, slip the first stitch as if to purl with the yarn in front of the work. Then, pull the yarn over the needle, pulling the two legs of the stitch long. After that, purl the stitches on the needle:
After purling on the wrong side
You basically do the same when you finish purling the required number of stitches on the wrong side. Turn the work so the right side is facing, slip the first stitch as if to purl with the yarn in front of the work, then pull the yarn over the needle, pulling the two legs of the stitch long. After that, knit the stitches on the needle:
In both cases, there is now a pulled-over stitch on the needle. This stitch looks doubled, but it is one stitch and should be worked as one.
Knit the pulled-over stitch on the right side
When you reach a pulled-over stitch on the right side, it looks like this. In this video, I knit two ordinary stitches, then the pulled over stitch, and then two ordinary stitches:
And similarly when you purl the pulled-over stitch on the wrong side. In this video, I purl two ordinary stitches, then the pulled-over stitch, then two ordinary stitches:
And this is what the shoulder looks like after being closed using a 3-needle bind off – you can just see that the stripes are narrower in one end, and that’s all it takes to improve the shaping of a sweater shoulder:
I am writing a pattern for a simple sweater with a simple shape and a gauge of 18 sts / 10 cm (4 inches). I’ll publish it as Walker 1_44 Sweater later.
I usually knit several versions when writing a pattern, and one of the versions of this sweater has a decorative rib edge that combines a normal rib with a zig-zag rib from Barbara Walker’s Treasury of Knitting Patterns. Walker calls this rib “rick rack ribbing”.
Here is the bottom edge of my sweater with the decorative rib. When I use normal rib, I usually use 10% fewer stitches for the rib than for the body. With this decorative rib, I use the same number, as the rick rack stitches are constantly crossing over, and that draws in the edge.
The rick rack stitches are actually a mini-cable, so the zigzagging look comes from the fact that the stitches are crossed. There are only two rounds, but they are difficult to explain in words, so I’ve made videos showing these stitches. They are shown for working in the round. The videos only show the special stitches, in the picture above, they are surrounded by purl, knit, purl.
Round 1: knit the second stitch through the back loop, then knit the first stitch:
Round 2: knit the second stitch through the front, then knit the first stitch:
It can be a bit difficult to get the needle through the front of the second stitch. I hold the stitches from the back, that makes it easier.
The Textile Museum in Herning, Denmark, owns a collection of hand knitted objects from the area around Herning in Jutland, Central Denmark. The collection contains shawls, underwear, socks, and footless socks. I work at the Textile Museum, and I’m currently giving a series of workshops centered around the knitted objects. A good group of about 10 knitters attend, and together we analyze the construction of the objects and try to recreate them, often in several rounds of knitting and discussion.
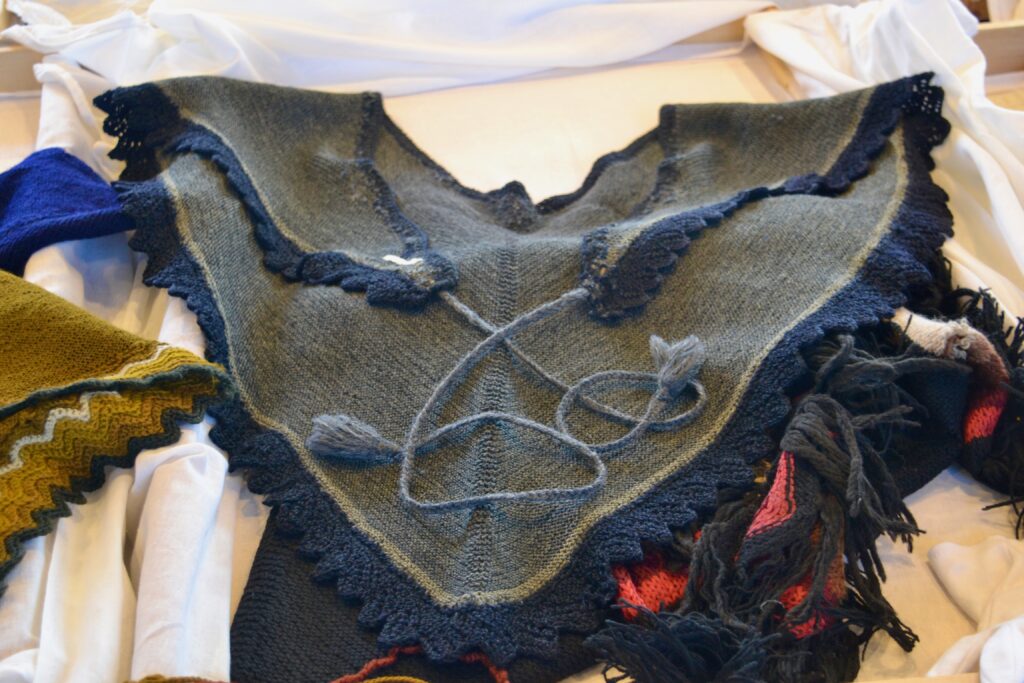
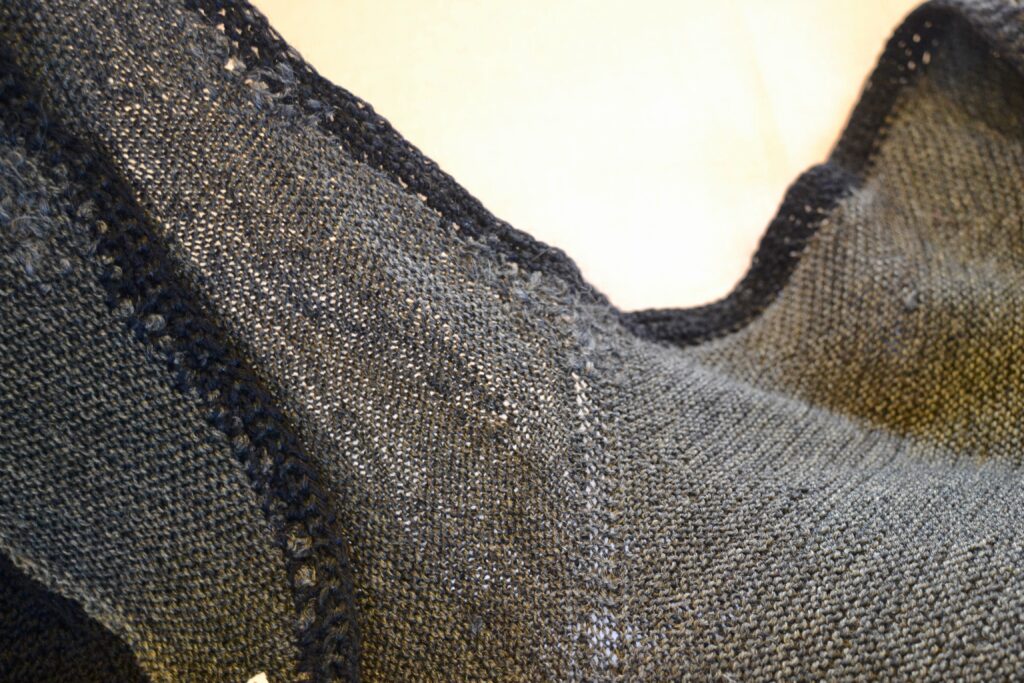
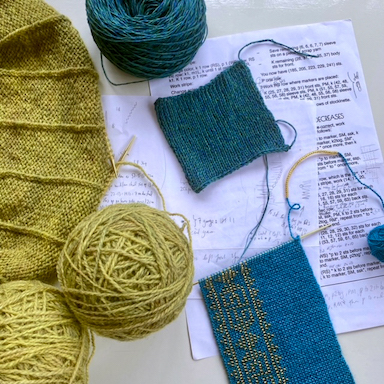
The first series of workshops was about shawls. The most well know shawl in the collection is doubtless the shawl that Danish knitwear designer Åse Lund Jensen examined and published a pattern for. She was very interested in historical knitting, and this very pattern pointed me in the same direction. So seeing the original shawl was very exciting. It is knitted from several green yarns with a black lace edge:
A bit hard to see, but the neck area is knitted using a thinner yarn. This is also the case with several other shawls in the collection, and I think it must be to make the shawl fit better:
The objects’s registration is not very informative. All it says is this: “Grey, knitted, with black edge. Typical, used in the 1880-1890’s and before and after. Practical piece. Herning parish, Hammerum shire. Gift from Mrs Jensen, Vestergade 85, Herning. 29/9-1931”. That’s all (and I really think it’s green, not grey. But I like the description “practical piece”).
Åse Lund Jensen died in 1977, and knitwear designer Marianne Isager took over her company and back catalogue of patterns. That is the reason that this and many other Lund Jensen patterns have lived on after her death. Some years ago, the shawl pattern became very popular in a striped but otherwise identical version known as “Chamomile”. A very nice example of knitting heritage being passed on, I think.
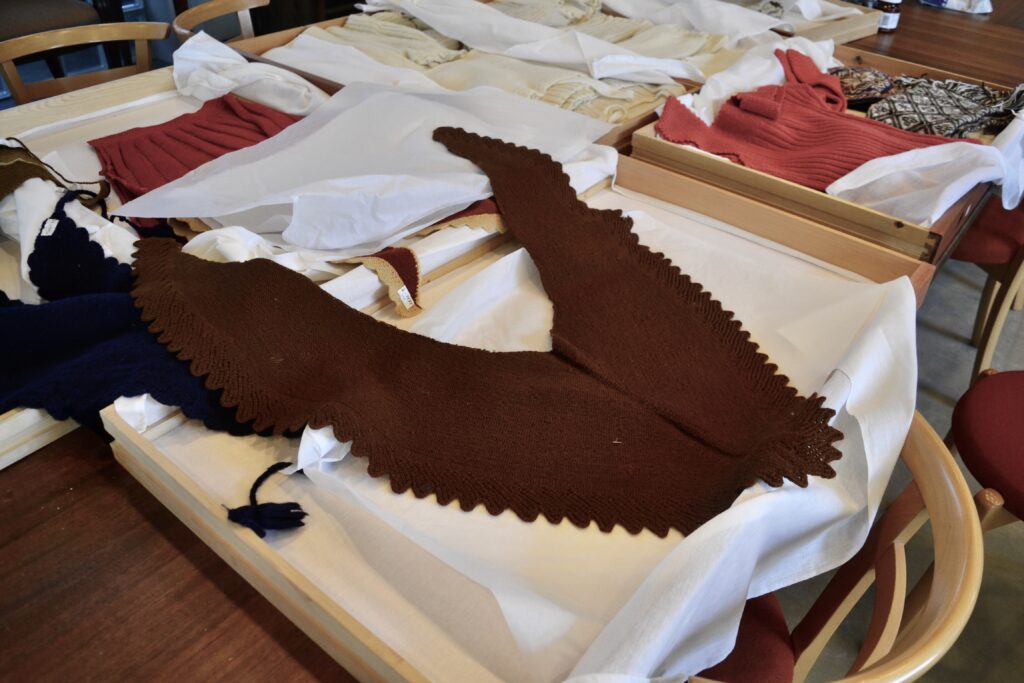
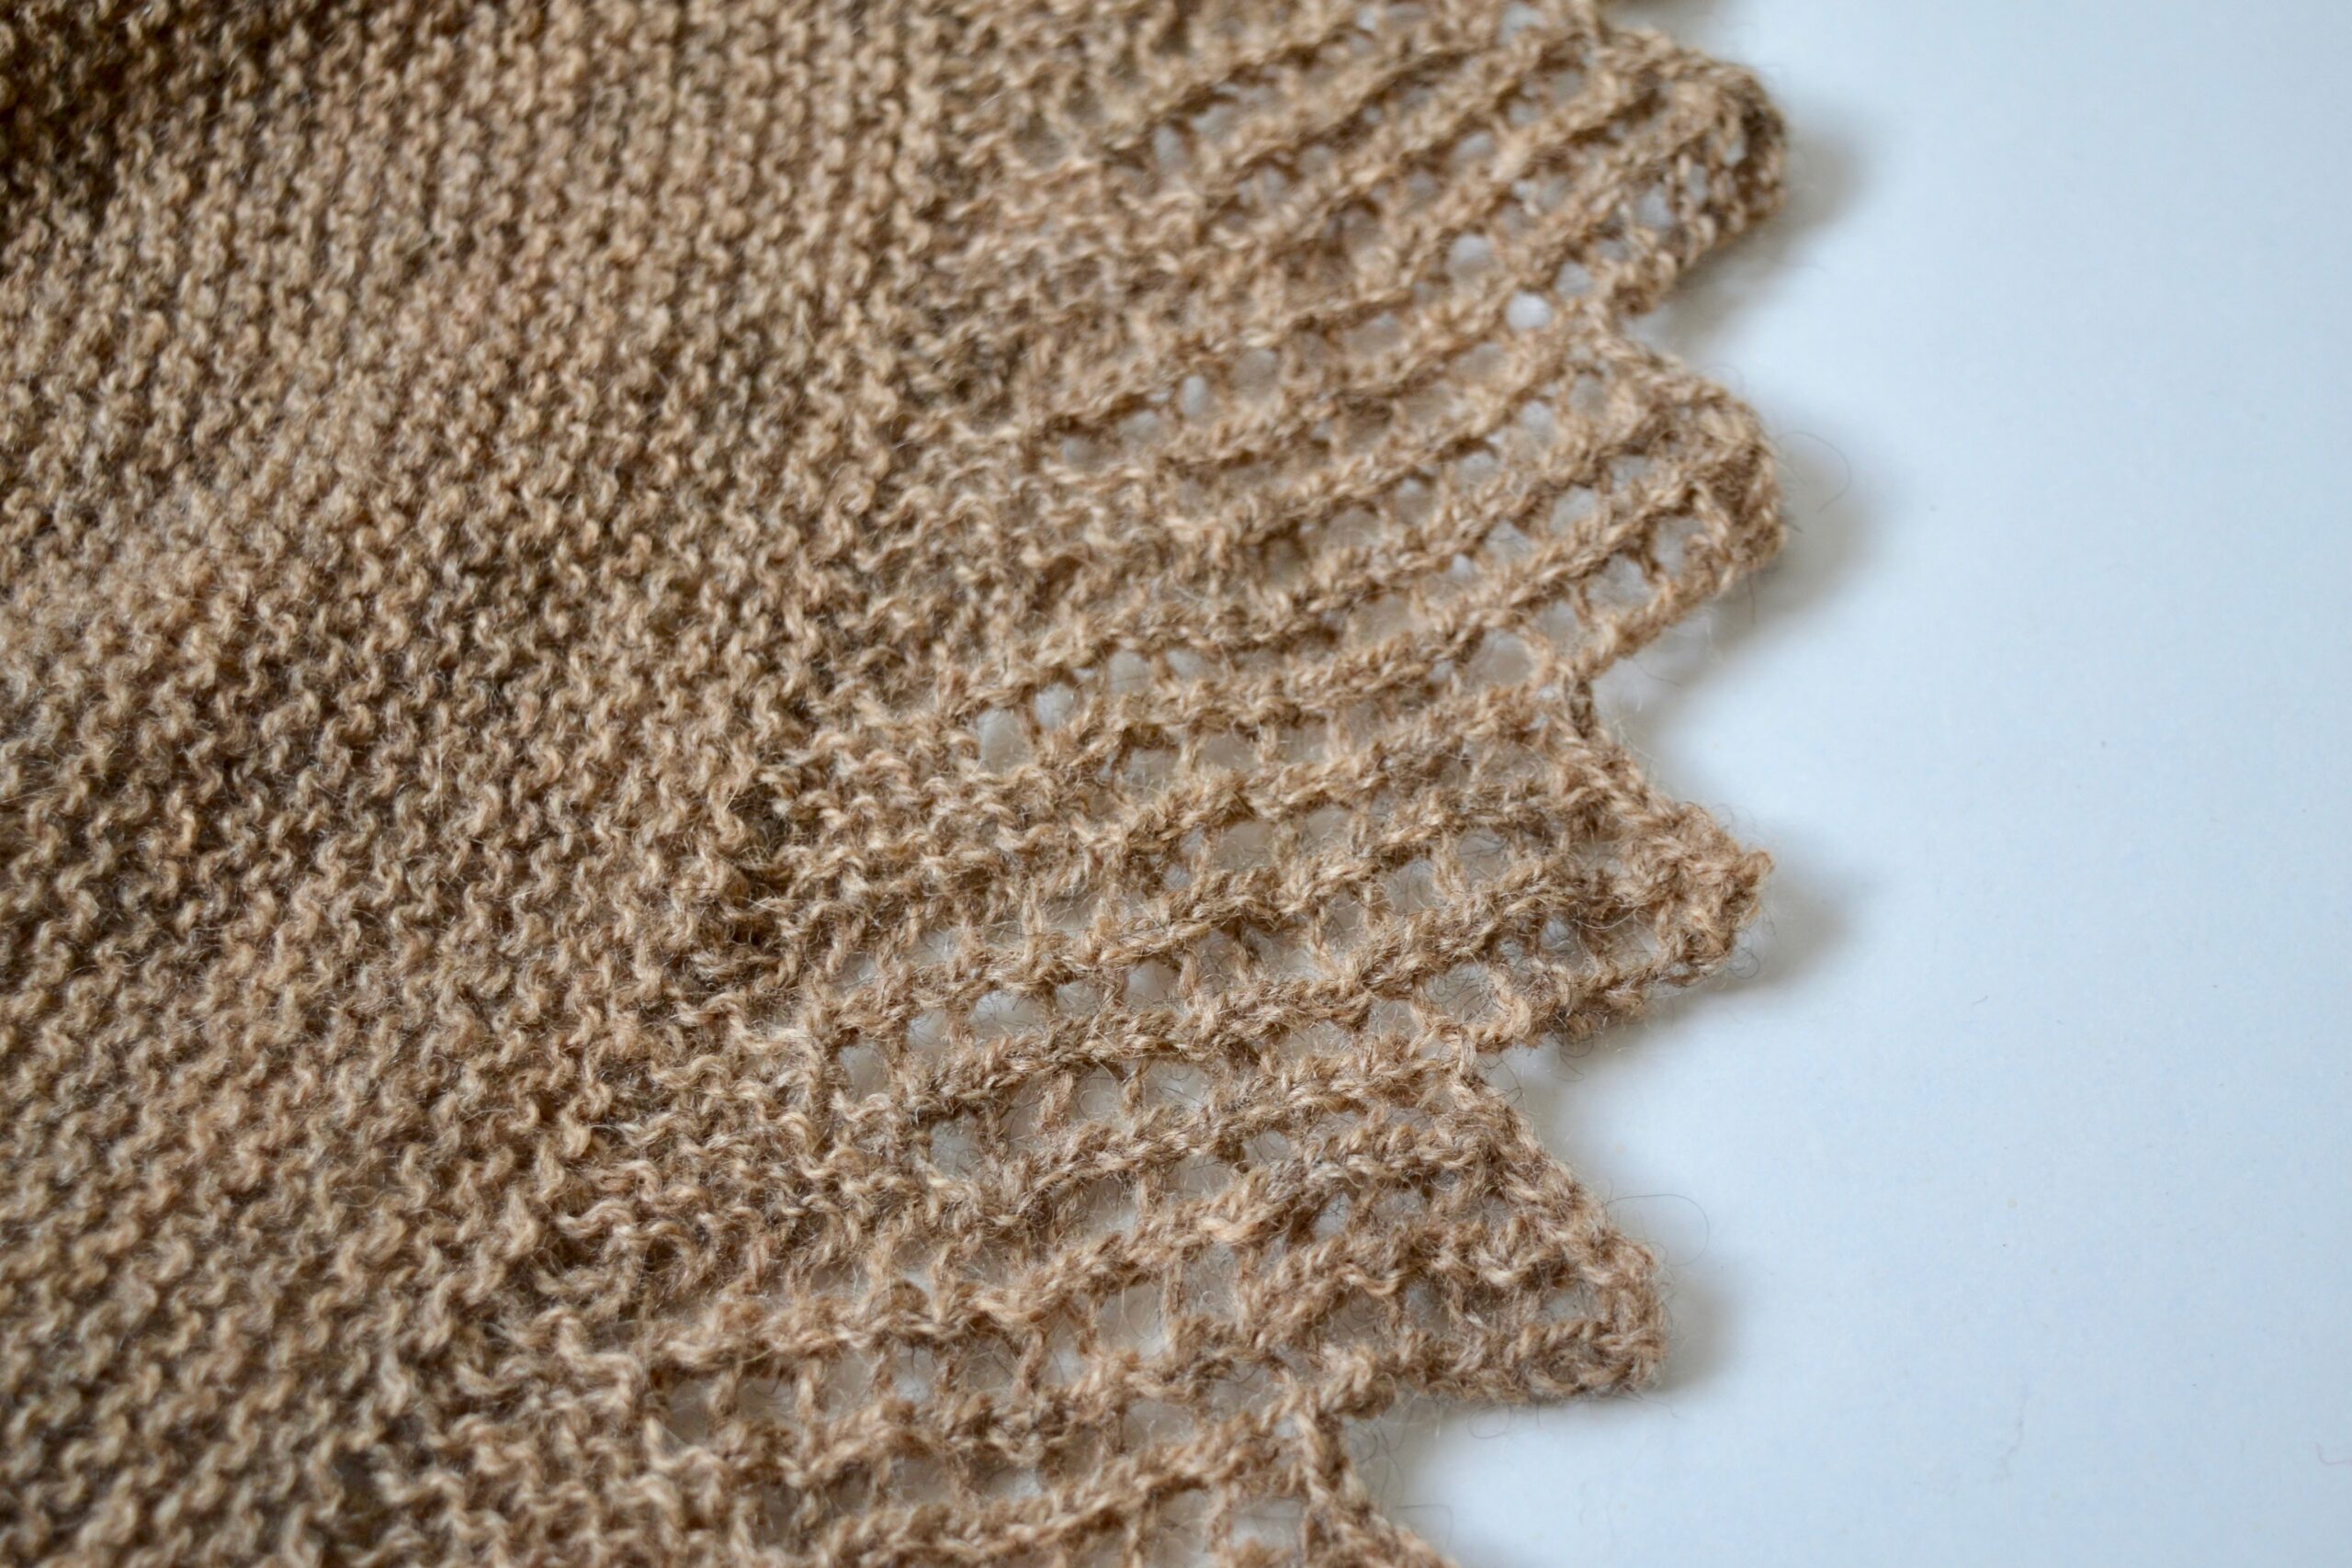
This brown tie shawl also caught my eye, and made me fall in love immediately! It has been in the museum’s collection since 2004:
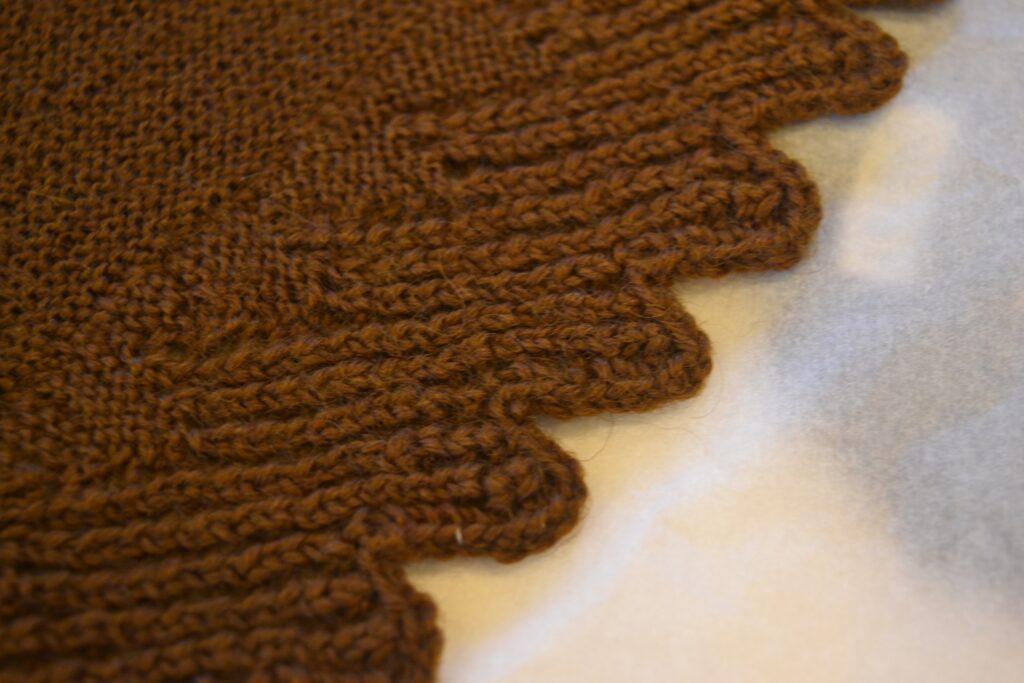
The objects’s registration tells us the following about the brown shawl: “Tie shawl. Material: Brown wool. The tie shawl is shaped. Has a lace edge. Ties in the tip of the triangle. Several repairs. Donor inherited it from her grandmother Karen Marie Møller, b. 1841, d. 1921, married to blacksmith Jens Peter Kristensen (later took the name Møller) b. 1840, d. 1925”.
Here’s a better photo of the edge:
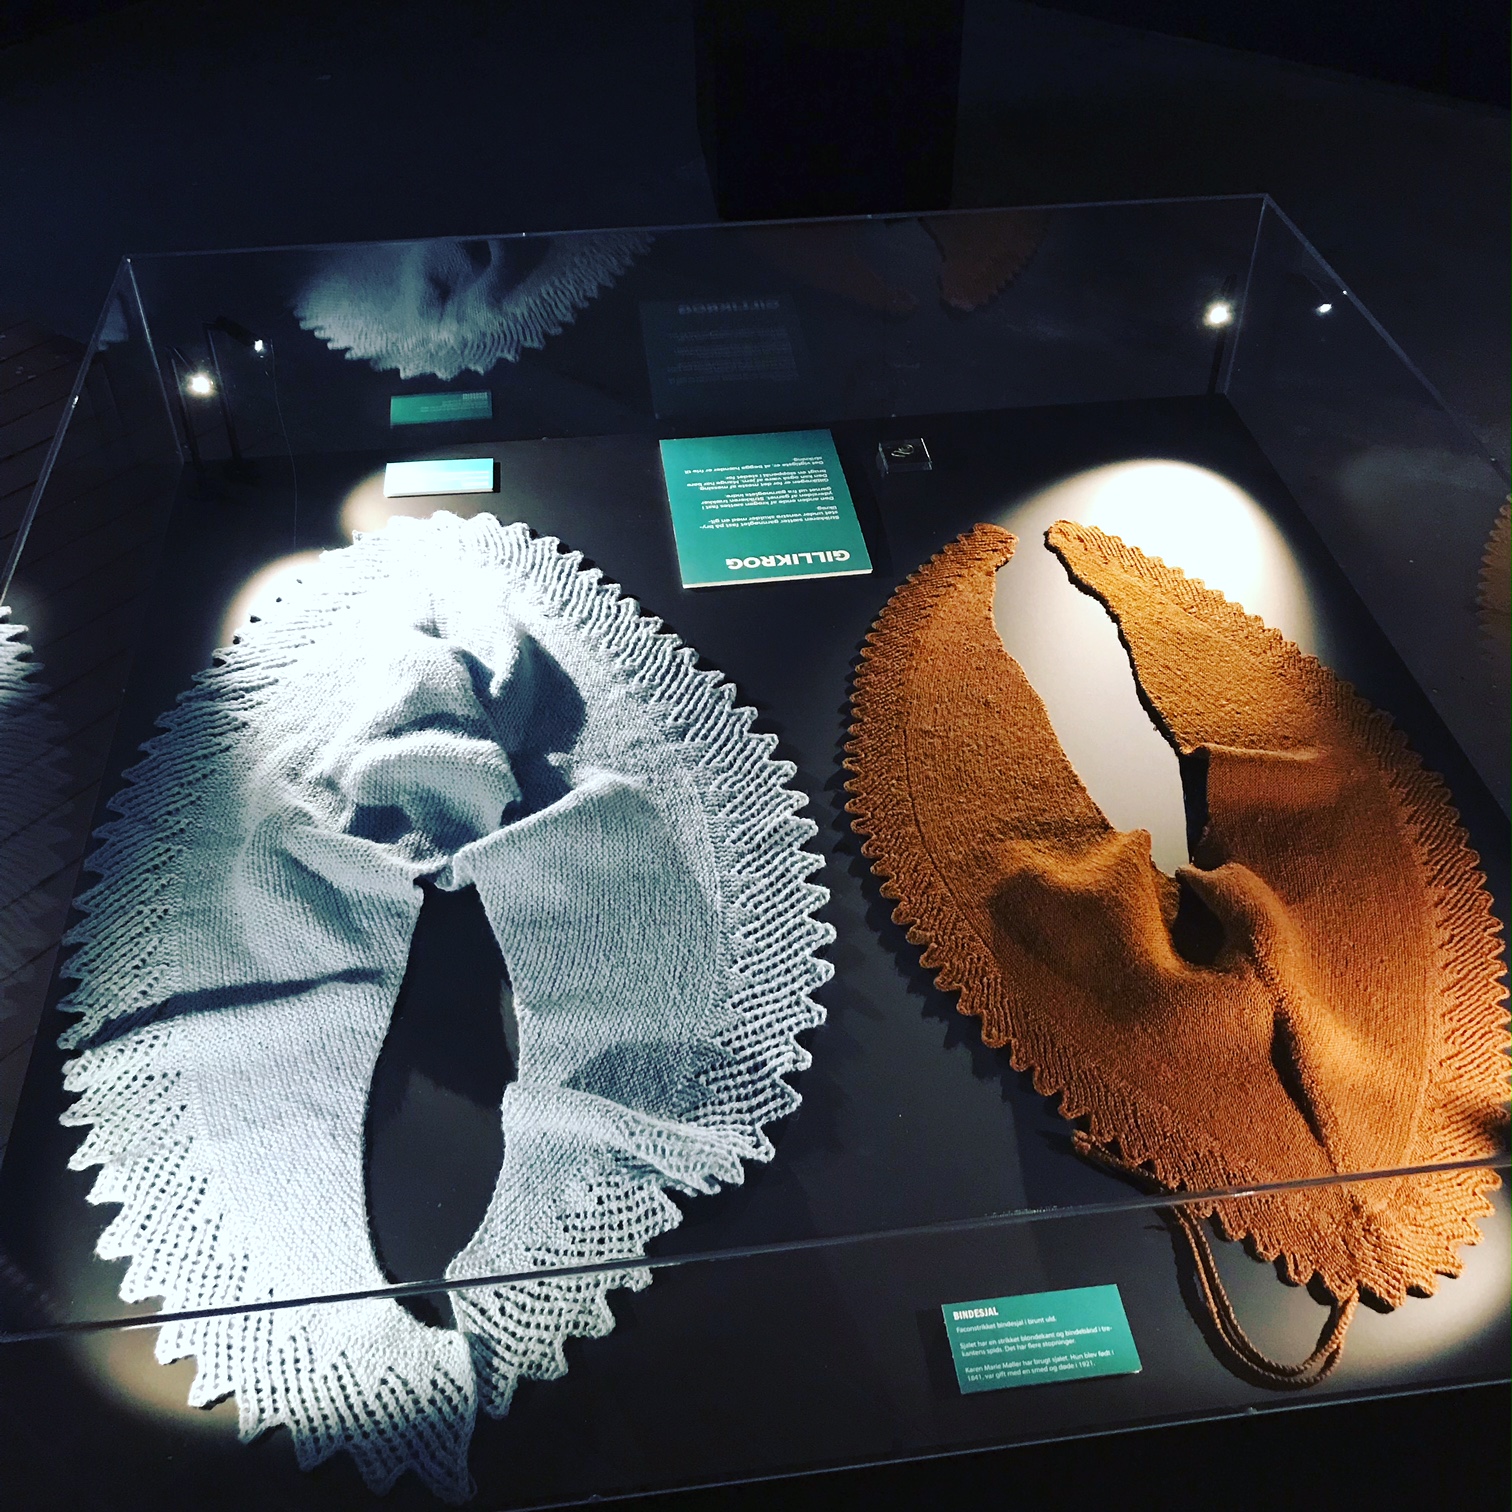
I have knitted quite a few swatches and several whole shawls based on the brown tie shawl. First a light blue version, which was on display along with the original in a special exhibition at the Textile Museum. I also made a brown version, using naturally dyed wool from my other page, Midgaards Have.
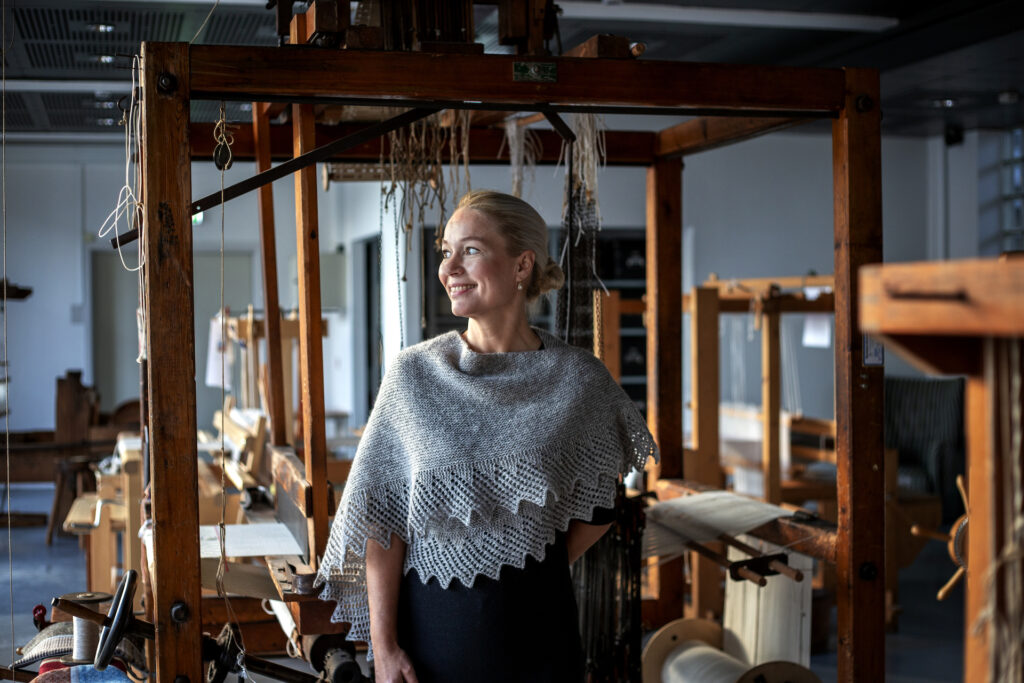
Finally I knitted the shawl in Rauma Finull, a yarn very well suited as it drapes well at this gauge, but also holds the shape so the lace tips can be blocked. Blocking shawls is a Shetland technique, and as far as I know the technique was not used for Danish tie shawls. They were knitted at a very dense gauge to use as outerwear, not for decoration.
My version of the shawl is modern. I worked it at a much looser gauge, so this will not work as outerwear in rough weather. But it can be an indoor “practical piece”, keeping the body warm and arms free for working around the house. It can also be decorative, especially if worked without ties. The construction is also modern. The historical shawls were worked from the outside, beginning with a large stitch count and decreasing on both sides of the work using only the knit 2 together decrease. The edge was worked separately and sewn on. My shawl is worked from the neck out and the edge is knitted on – I just find that easier! Here is the shawl worked in grey Finull:
Astrids butik is my shop, and the place to find all yarns and patterns connected to the project Retrofutura. It is also the place to find all products connected to the project Midgaards Have – natural dyes, yarn for dyeing, seeds. And a growing selection of other yummy yarns and knitting design
Provisional cast on is one of my favorite knitting techniques. It is a cast on that you remove later, freeing live stitches that you can knit. I sometimes make a provisional cast on in the middle of a stockinette sweater if I haven’t decided how long it will be. Or if I’m not sure I have enough yarn. A provisional cast on is sometimes a good idea instead of an edge that stays when knitting sweaters both top-down and bottom-up. By finishing all edges with bind offs, I find that it is easier to make edges that fall perfectly. And bind offs on all edges also make them identical.
There are several methods for casting on provisionally, so I am going to show the one I think is the easiest. When using this method, you crochet the provisional stitches around the knitting needle. Below, I show the method both for left-handed and righ-thanded people. I am left-handed, so I know how impossible it is to study photos to learn something new while simultaneously having to mirror the photos in your head!! I made the right-handed photos by mirroring the images.
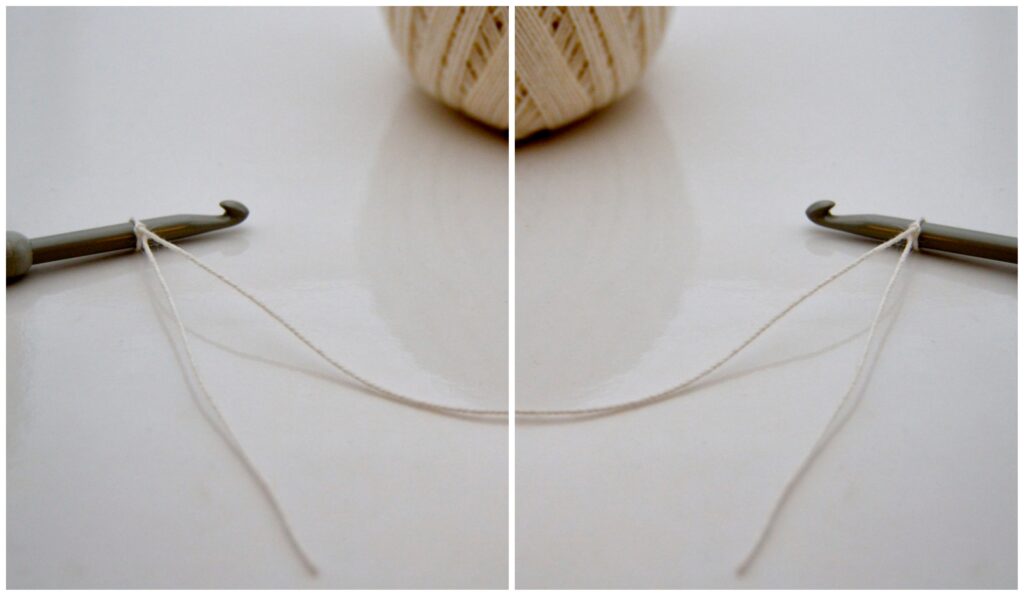
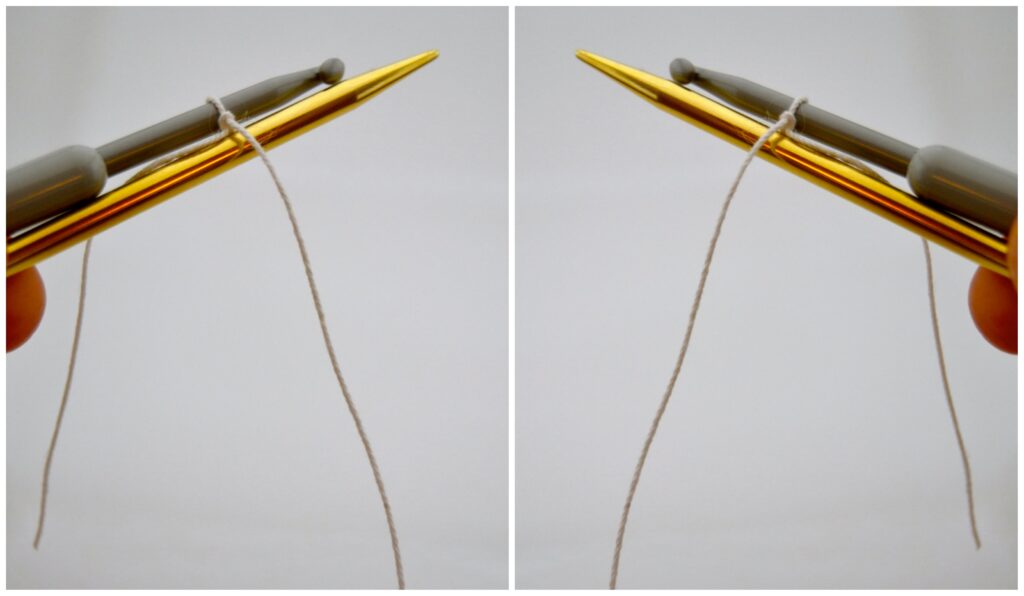
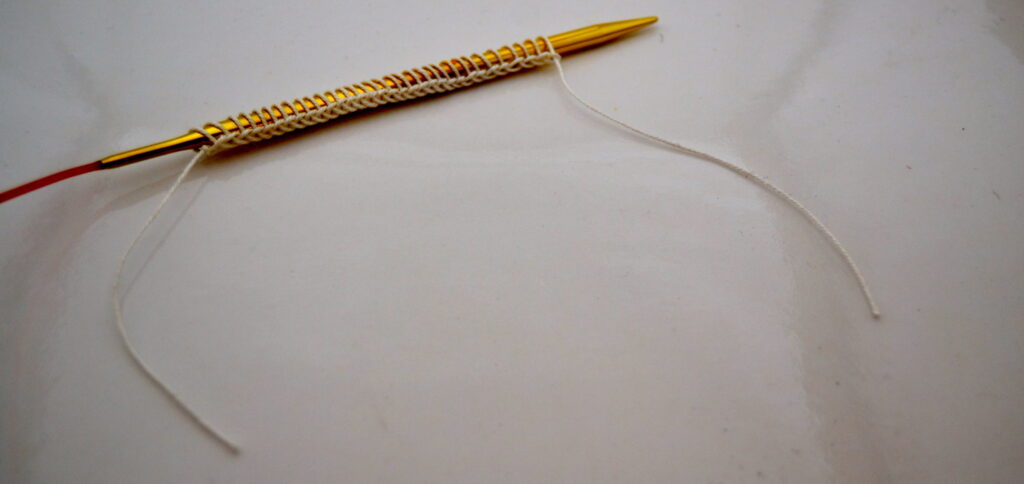
Use another type of yarn than the one that will be used for knitting. A smooth cotton yarn is perfect. Use a crochet hook with about the same size as your knitting needle. To begin, make a standard slip knot:
Put the knitting needle below the crochet hook, making the yarn end hanging over the needle:
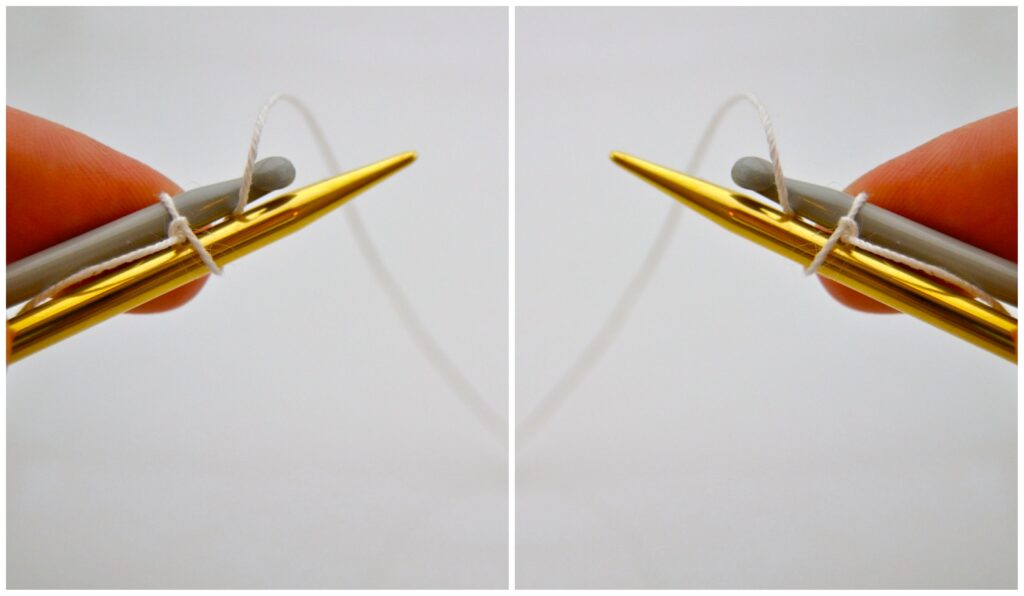
Carry the yarn up the back of the needle and over the hook:
Pull the yarn through the loop that was already sitting on the hook – there is now one stitch on the needle:
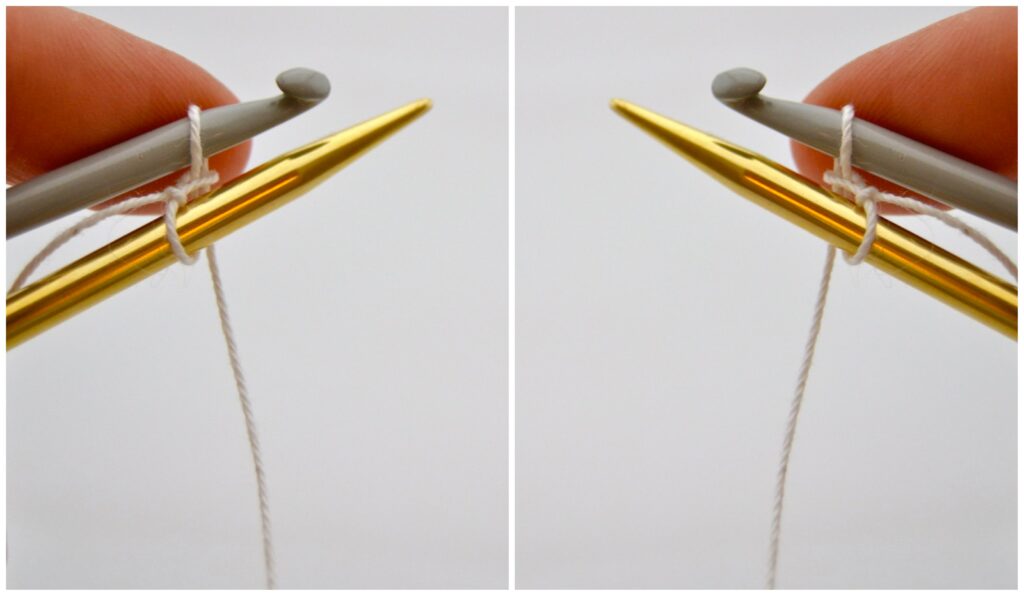
Carry on in the same way – for each stitch, the yarn goes over the front of the needle, up its back, over the hook, and pull through the loop:
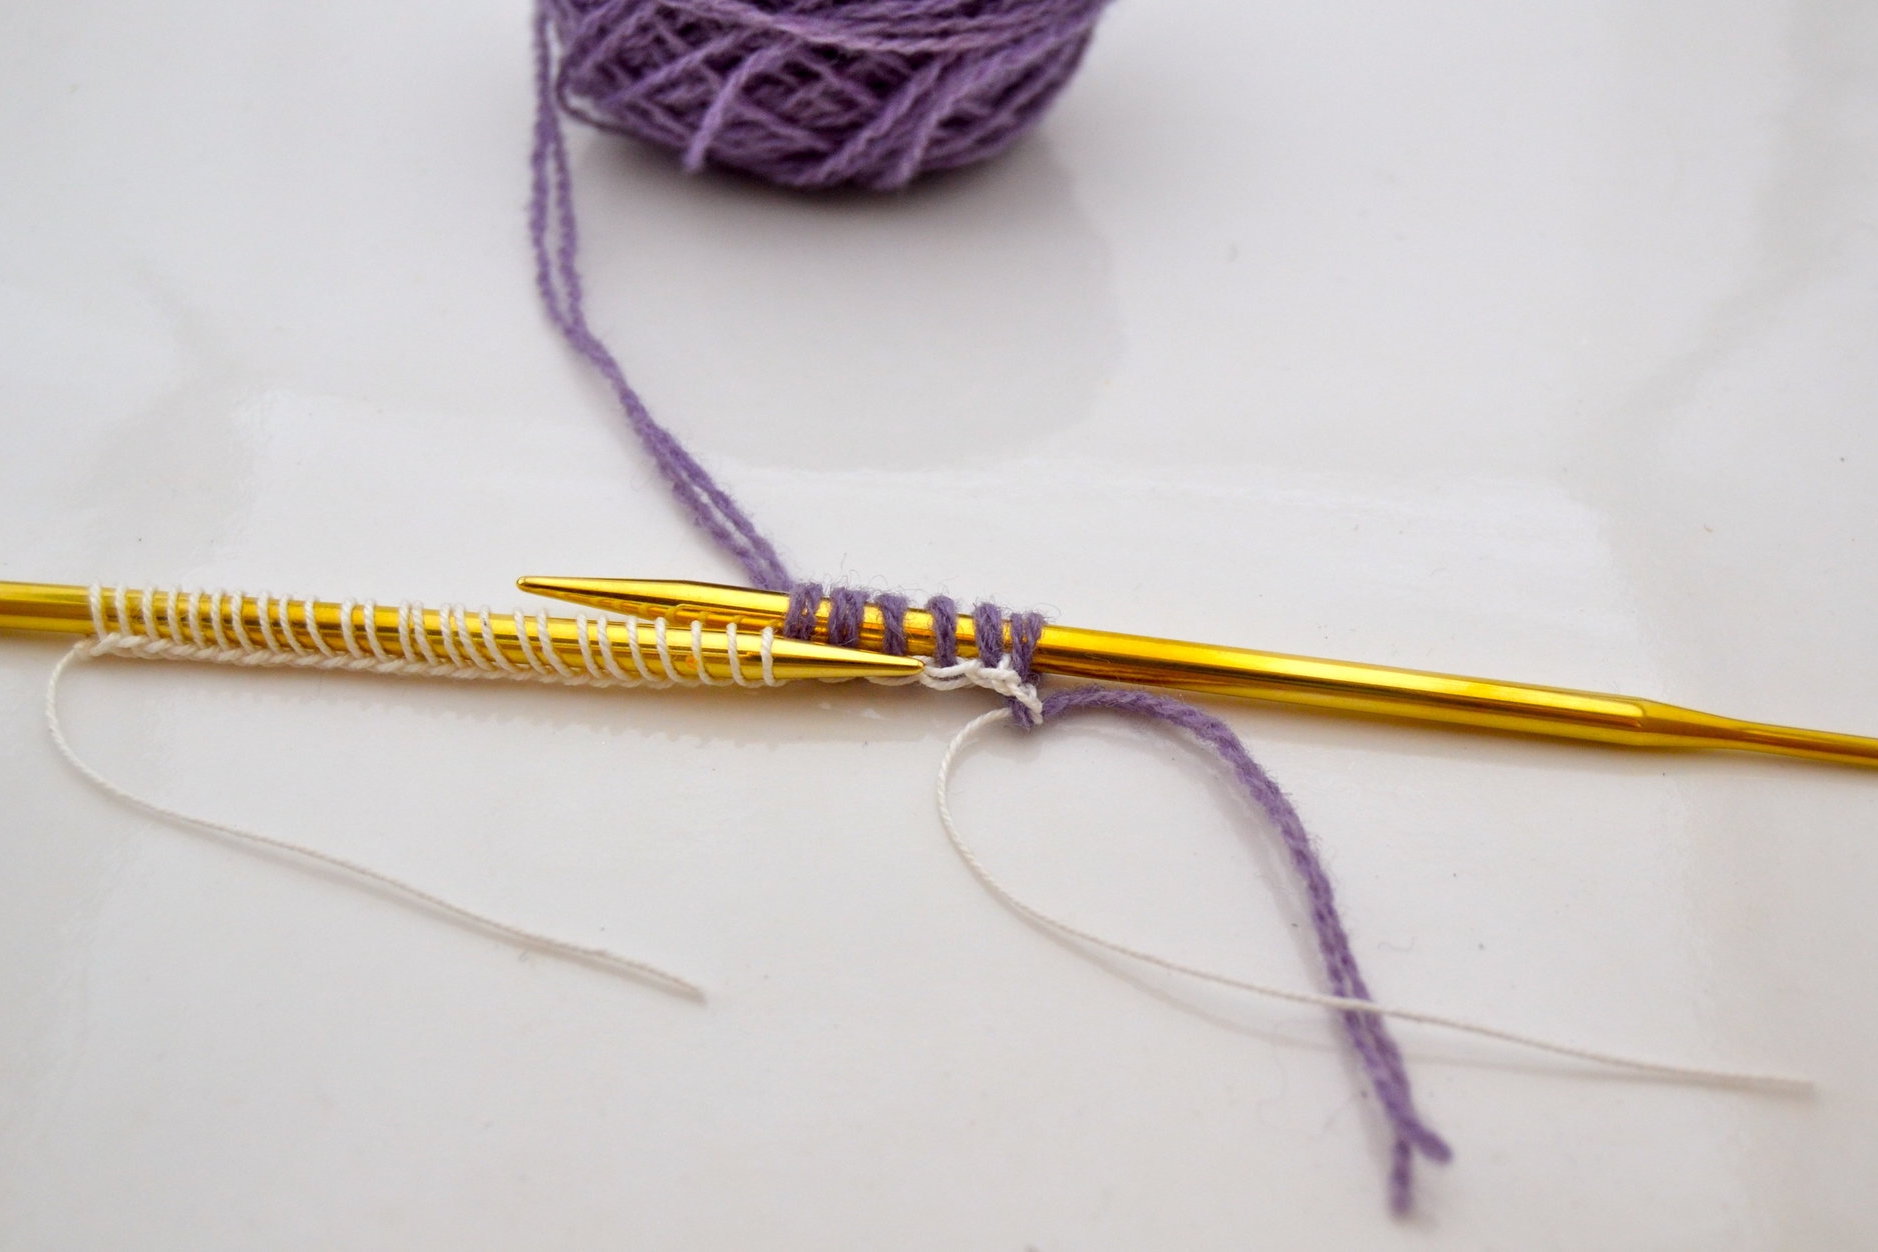
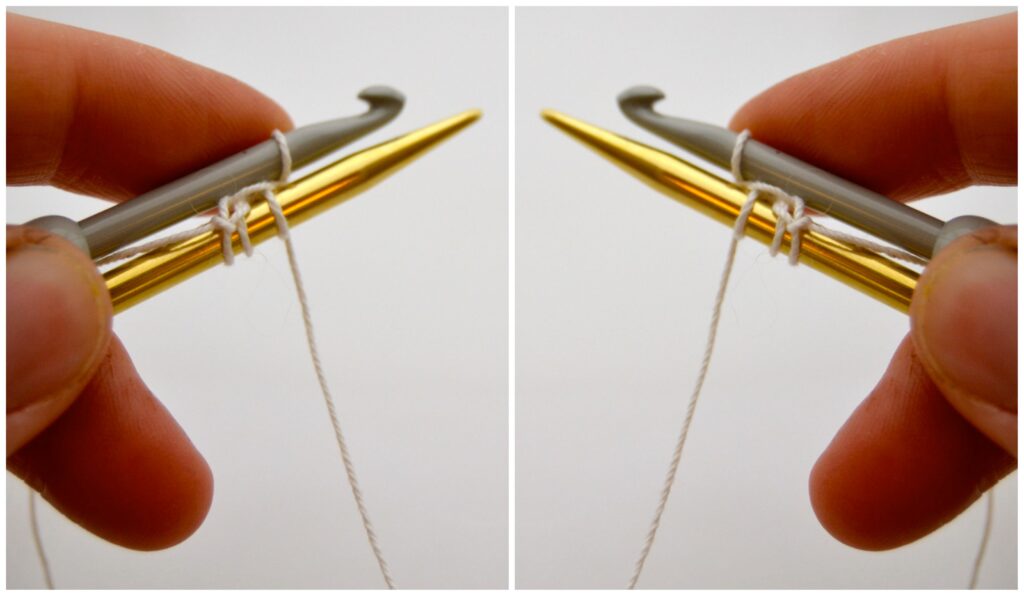
Cut the yarn when enough stitches are cast on. From now on, things look the same for left- and right-handed people. The cut end is on the right side:
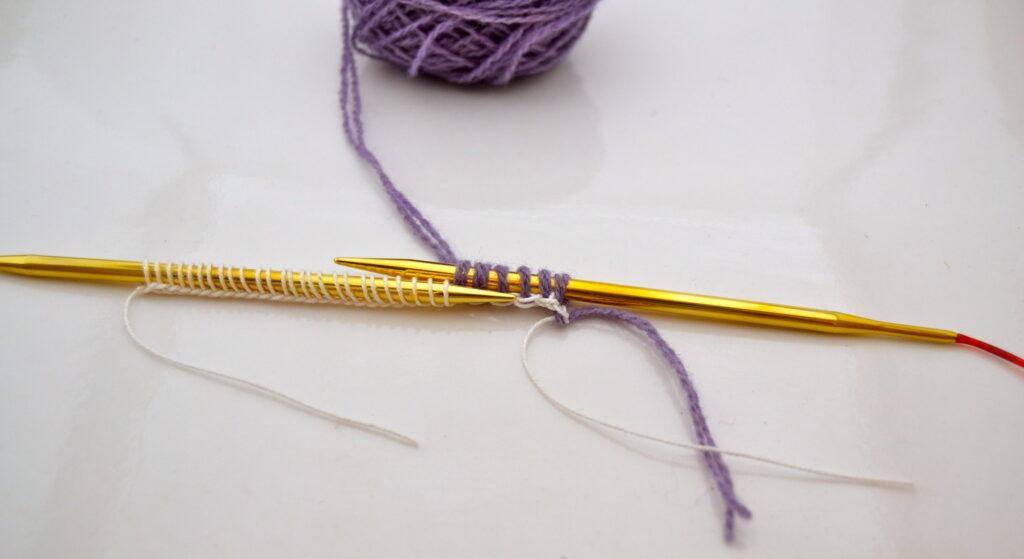
Tie the working yarn to the right side. I just tie an ordinary knot, then knit the provisional stitches:
Later you’ll come back and remove the white yarn. Untie the knot and put the live stitches on to a needle as the provisional stitches are unraveled. In this case, my purple yarn end is rather short, it is more practical to leave a slightly longer end in the beginning. That way, the end can be used to knit the first few stitches before adding more yarn.