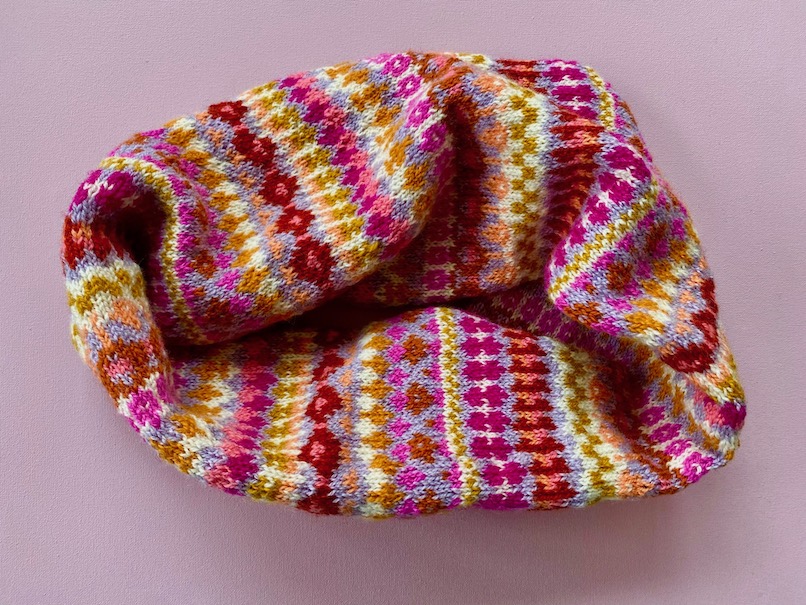
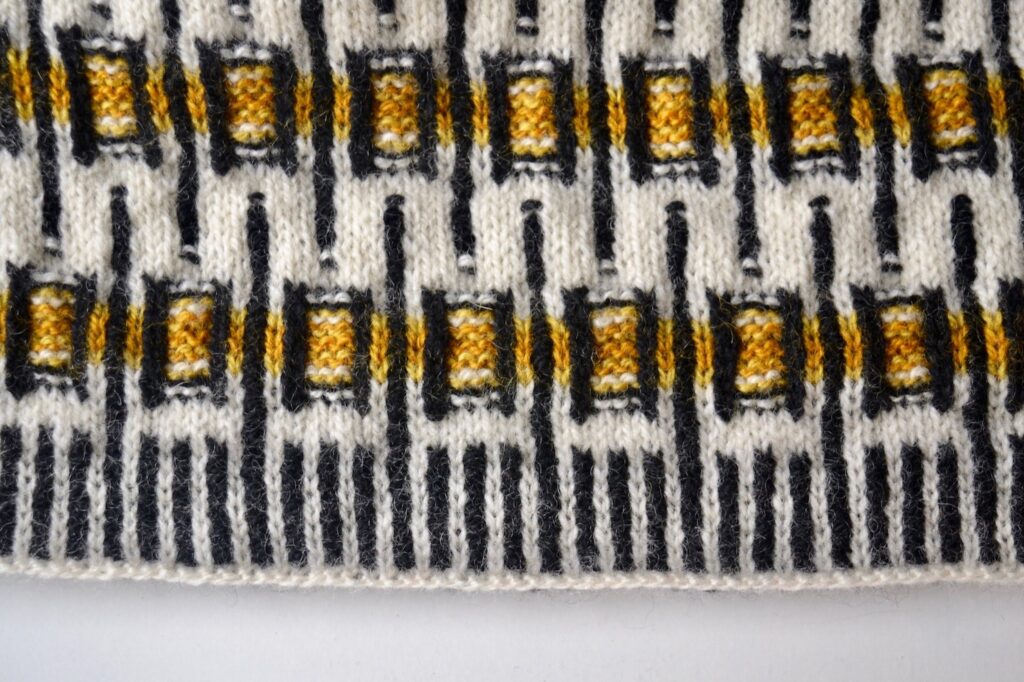
Lately, I’ve been a bit obsessed with knitting cowls in stranded knitting. They are easy projects with a good stretch of nice straightforward knitting, enough that it’s now one of those projects that are done just when you get started. I knit cowls by knitting in the round until the piece is long enough, around a meter, then twisting one end 180 degrees and sewing the two ends together. The resulting cowl has a very nice drape around the neck, fits loosely, and can be formed to drape as you like it. And, it’s a good way to try out a color pattern to see what it looks like one a bigger surface.
Here, I’ll show you how I sew a cowl together. I am using my Memory Cowl to show this step, the pattern for this will be published when the pattern is finished and has been tested (if you are interested in being notified when I have a test, you can sign up here). Memory Cowl is a relative of Memory Vest, and you can read the story about that pattern here. Both patterns are based on a child’s vest my grandmother, Judith Harvest, knitted in the mid-1970’s.
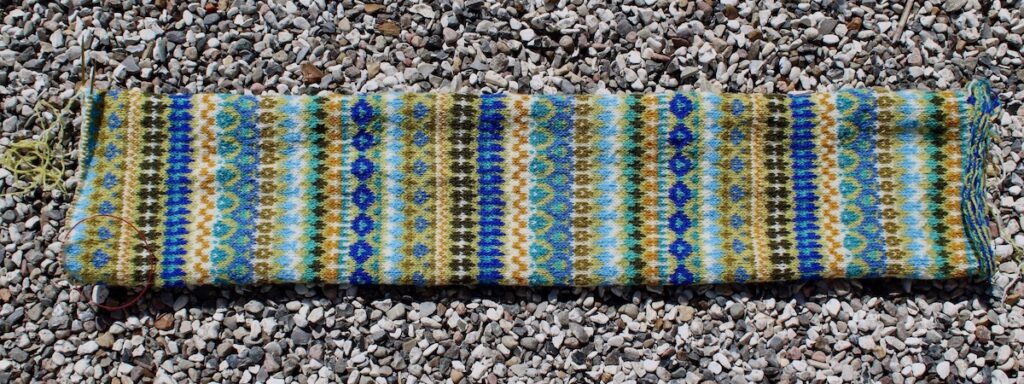
I cast on using an ordinary long-tail cast on, then just knit in the round according to the diagram until the cowl looked like this:
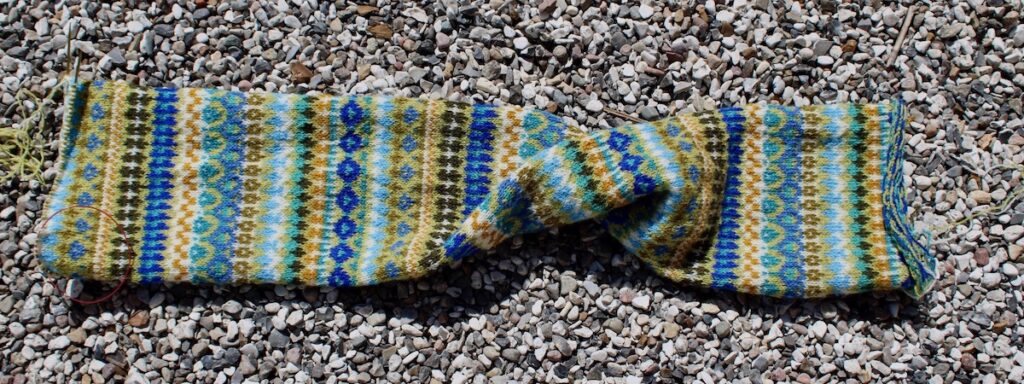
Then, I twist one end 180 degrees:
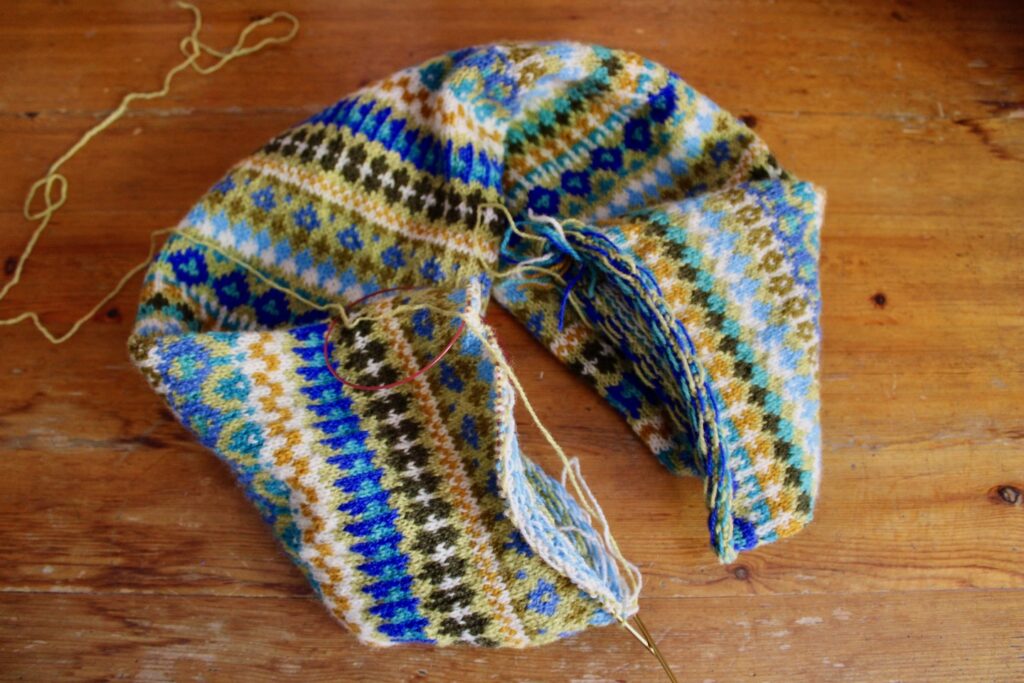
And this is what it looks like with the 180 degree twist and the ends brought together, ready to sew:
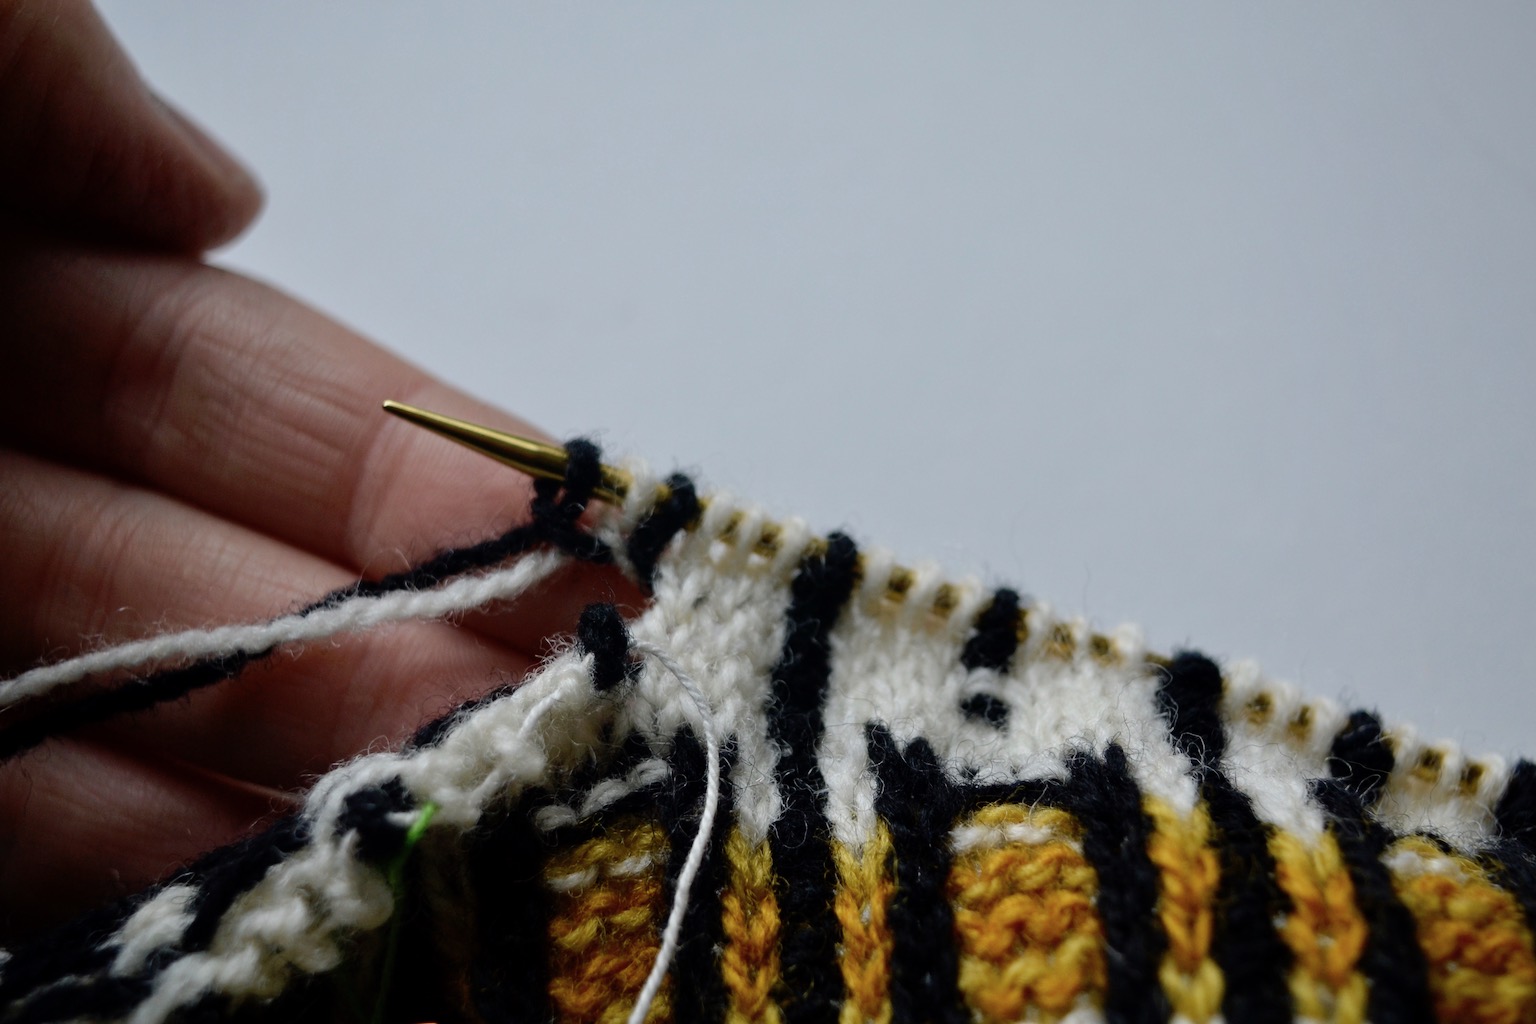
I sew using a kind of grafting that I found by improvising. It’s a way to graft the open, live stitches on to the cast on edge. I find this technique a lot easier than true graftign, where both sides have live stitches.
The way I do it is as follows, and is also shown in the video below:
Sew from back to front through the live stitch
Sew through both “legs” of the stitch on the other edge. Note that I sew into the stitches of the first stranded knitting round, not the one-color round as that is the cast on
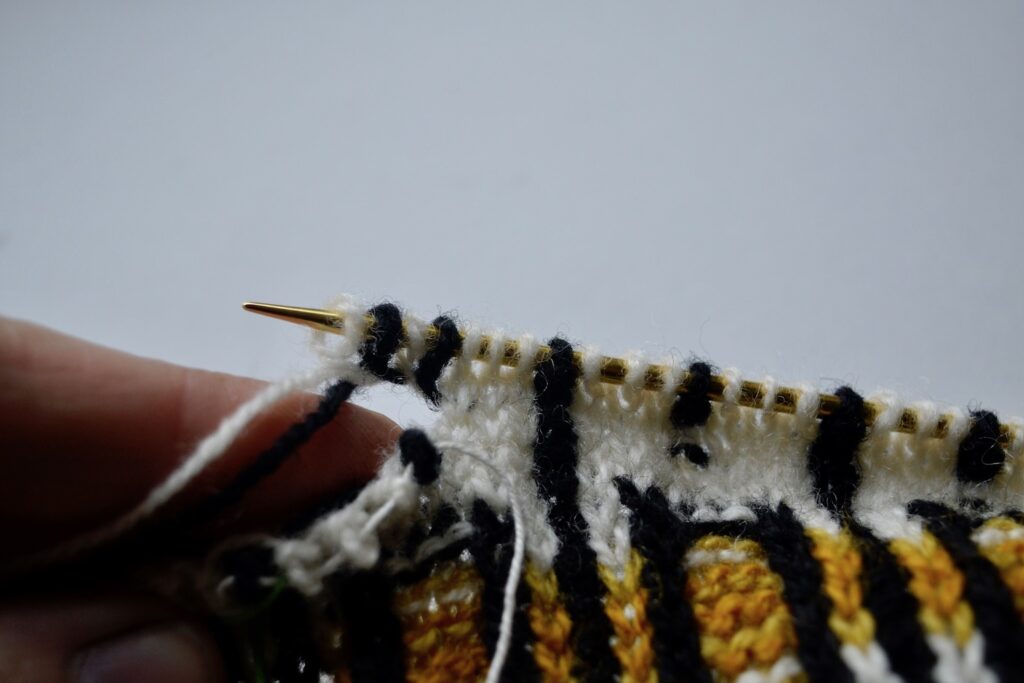
Sew into the live stitch from the front and drop it from the needle
Repeat for all stitches (and you may find a nice rhythm where sew from the front-drop stitch-sew from the back becomes one motion).
I don’t worry about correct tension as I sew – after some stitches, I go back and pull the yarn so the tension is correct, and after that is done, the seam becomes quite invisible.
When all stitches are sewn together, sew in the end and the project is done.
PS: Sorry about my garden hands. I scrubbed them but they still look quite interesting. But hey, at least it’s not as distracting as those knitting videos with long brightly colored fake nails, I think!
Recomposed is a project co-created by folk musician Maja Kjær Jacobsen and myself, Astrid Colding Sivertsen. Maja was searching for a knitwear designer who is interested in creating new from the old, and that happens to be the overall theme of my own project, Retrofutura. Maja and I have been working on the project Recomposed for a while, and Maja wrote about it (in Danish) a while back on her home page. I had not written anything yet, so I decided it was time for that!
Recomposed is a project that plays out in the cross section of folk music and knitting. Our overall interest is cultural transmission – past and present. Folk musicians and knitters of the past have found their inspiration locally. A musician might learn a tune from another musician, or just copy a tune they heard. Knitting patterns were passed on in the form of samplers, but also by knitters just copying a pattern they saw. Tunes and patterns migrated, often slowly, transmitted actively and passively, mutating slowly during their migration.
Now, our senses are under constant bombardment. Everything can move over long distances with extreme speed. Explaining how mass media and social media have hypercharged curtural transmission is entirely unnecessary. That is why Recomposed focuses on finding inspiration that is nearby and old, transforming that into new music and knitting.
The idea may sound a bit airy, so we decided to bring it down to earth by choosing one specific photograph as our starting point. We chose a portrait of Roland Peter Andresen from 1895.
Evald Tang Kristensen was a Danish folklorist who was responsible for collecting a very large number of stories, folk tales, and songs (some with medieval or even older roots) by travelling by foot to speak to a large number of informants. Evald Tang Kristensen brougt the photographer Peter Olsen with him on one such journey in 1895, Olsen making the trip with an extremely heavy back pack filled with photographic glass plates. The result was a series of portraits of the poor informants wearing their everyday clothes. Many of them with some work, like knitting, in their hands. The portait series is quite unique in showing real people wearing their real clothes, as people would dress up in nicer (maybe borrowed or rented) clothes to have their portrait taken. Some of the informants attempted changing into something more presentable, but were prevented from doing so.
Roland Peter Andresen lived in an almshouse in the northern part of Denmark (Vendsyssel). He was born in Nibe in 1819, a son of itinerant people desribed by the Danish words “kæltringer” or “natmandsfolk” – derogatory terms that are hard to translate. “Kæltring” is still used, but now just means a person of low morals. An older meaning is a poor, itinerant person, not a gypsy but someone similar to the travellers of Ireland. “Natmand” is a waste collector or knacker. Someone who removes dead animals or feces.
Back to Roland’s life. His parents were arrested shortly after his birth, and he seems to have been a ward of the state. As an adult, he worked at the estate Baggesvogn where another worker taught him a large number of folk tales. Roland married and fathered 12 children, only 5 of which survived. As an old man, he lived at the almshouse, and that was where Evald Tank Kristensen visited him and heard all his tales.
The photograph of Roland can be found in the Folklore Archives at the Royal Danish Library, but har also been published, e.g. in the book “Gamle kildevæld”. A Danish language book with a hard-to-translate title. Directly translated, it means “Old fountains” meaning fountains of old myths and songs.
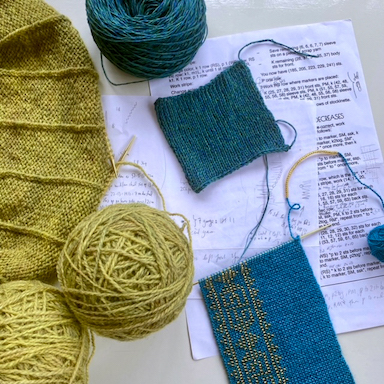
Left: Maja at the Royal Danish Library, written on the photograph by hand: Roland Peder Andresen, Sindal, knacker. Right: my first swatch for the Roland pattern on top of several books opened to relevant pages.
But what really catches my eye is – obviously – Roland’s sweater. It is of a type now known in Denmark as an Icelandic sweater. Two-color knitted sweaters like Roland’s were used all over Scandinavia, mostly by men, for everyday wear/workwear for the poorest people. It appears that Roland’s sweater was cut open and a fabric buttonband sewn on.
Below, I’ll go into more detail with the sweater type. Another day, I’ll write about the process Maja and I used to work with the sweater’s color pattern in knitting and folk music form.
The Icelandic sweater originates in the Faroe Islands, and the name “Icelandic” may just mean “coming from an island”. Or – as suggested here – the sweaters may have been traded from the Faroe Islands to Denmark via Island. The Faroe Islands (Faroe meaning sheep, so the sheep islands) produced wool and finished knits, and those were the most important trade goods for hundreds of years.
Knitting arrived in the Faroe Islands in the 16th century, and sock production quitckly grew. Socks were the first big export article for the Faroe Islands, selling more than 100,000 pairs per year around 1770, equivalent to 98 % of total export. During the 18th century, sock production fell and sweater production increased. It is not known when color patterning of sweaters began, but it was common by the end of the 18th century. The source for this information is a book by Svanhild Strøm and Marjun Biskopstø, the Danish version is “Færøsk strikkebog”. There is a book by the same authors in English, “Faroe Island Knits”, but it doesn’t seem to be the exact same book.
Import of wool sweaters from the Faroe Islands to Denmark was controlled by a trade company run by the Danish state. In a move to counter falling quality, the trade company published instructions in 1833, defining the weight, dimensions, and patterns of the sweaters. The instruction is reproduced in Annemor Sundbø’s “Koftearven” (the English “Norway’s Knitted Heritage” is the translation of this book, I believe) and is given in a very dull and formal tone. But the main point of the instruction is this: any color pattern was permitted, as long as the floats on the back were not over more than 4 stitches. The light main color is not mentioned, but the dark pattern color is clearly defined: the yarn must be dyed with korkje, a red dye extracted from the rock lichen Ochrolechia tartarea – the darker color the better. Only in regions where no korkje grew was black patterning permitted, but not grey.
Finding historical Icelandic sweaters in Denmark is very difficult, probably because few are in existance. This is common when interested in clothing of the past: the clothing of the elite still exists. Nice clothing from middle class people may be preserved. Poor people’s ugly, worn out clothing is almost never preserved. It has been used up completely, ending its life as rags. Also, such clothing has not been seen as worth preserving.
The closest I’ve come to an older Icelandic sweater in Denmark so far is a photo in the book “Alverdens strikning” by Ann Møller Nielsen, a book about knitting around the world. You can just see the open book top right in the photo above of my swatch. The sweater belongs to the Museum at Koldinghus.
Ann Møller Nielsen describes the sweater as natural white with “a pattern of, originally, red yarn that faded with time”. The red color is not visible in the photo, but Nielsen took the photo herself, so she must have examined the sweater and seen the color. The information provided by the museum is rather brief, and even uses the photo from Nielsen’s book. But it does tell us that the sweater was found unregistered in the museum’s collection, it was cleaned in 1978, and it was used by a marine soldier. There is no information about how old the sweater may be, but it does seen to stick to the 1833 instructions with its faded red color: the dye from korkje is known to fade quickly.
Searching all Danish museum collections gives only a few hits. I can only find a few sweaters that sound like the right type, so here, here, and here, but there are no photos and they seem to be 20. century.
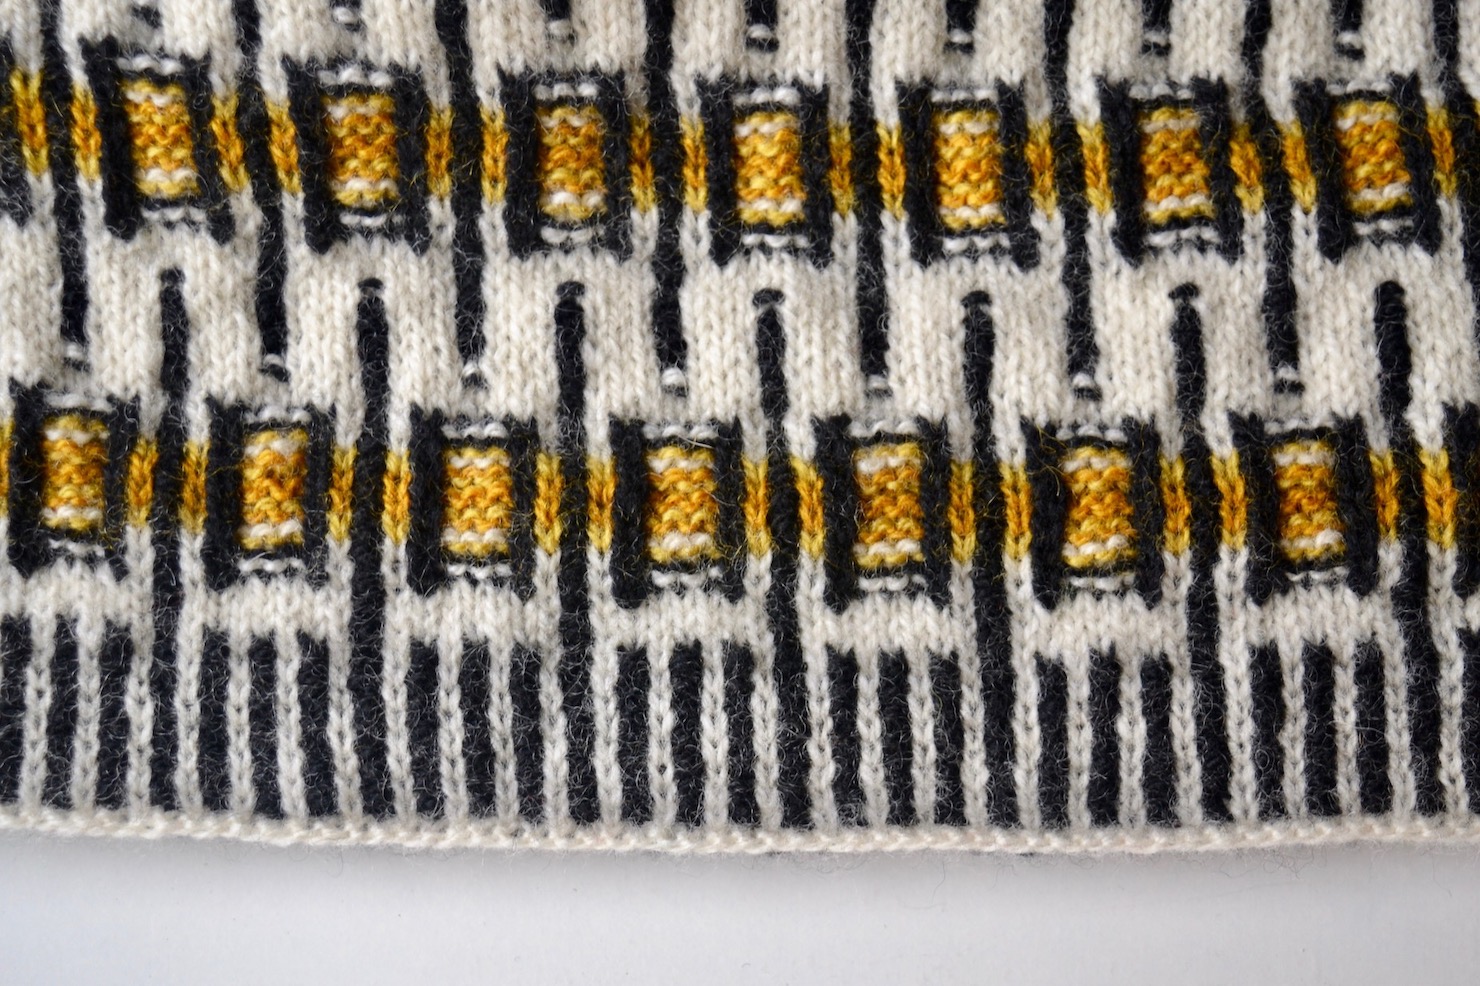
With so few actual sweaters left, photographs are a good source of information. Besides the photo of Roland, there are others of Danish men in Icelandic sweaters. This photo, from Bornholmernes historie by Ann Vibeke Knudsen, shows a young fisherman from the island Bornholm wearing a Icelandic sweater. The photo is taken around 1910.
Fisherman from Bornholm, ca. 1910.
The picture looks a bit staged with both hat and pipe, but the sweater looks real. The surface shows wear, and there is a sewn on neck edge made from fabric. The pattern is exactly the same as the ones on Roland’s sweater and the Kolinghus sweater.
The photos of Roland and the young fisherman from Bornholm are black & white, so we cannot quess at the pattern color. But a photo of a sweater in Sweden’s Nordiska Museum is in color, and shows red patterning.
Man’s sweater in the collection of Nordiska Museet, Sweden. Photo by Nordiska Museet CC BY-NC-ND 4.0
The description does not say if the sweater was made in the area where it was used, so there is no telling if the red coloration is complicance with the 1833 instruction (which was for trade goods) or if red just seemed a normal choice to the knitter. The sweater was used in the period 1850-1870 in Värmland by someone descibed as a “finngubbe”. I searched around to find the meaning of this word, and it turns out to be an old derogatory term for a Sami man.
All the sweaters have two things in commen. One is who wore them, the other is how the sweaters were knit and finished.
The wearers of these sweaters (whether bought or made locally) were the poorest people, the lowest ranked in their society. Knackers, travellers, finngubber, sailors, and soldiers. Annemor Sundbø shows a picture in her book of a number of inmates of al prison, all wearing “Icelandic” sweaters. At the time the above mentioned sweaters were in use – 1910 and earlier – richer or higher ranking (or even middle class) people did not wear knitwear visibly. They may have used knitted underwear or home wear but never anything knitted in public. The better off wore woven clothing.
The sweaters have many similarities. All have the exact same pattern. The fabric of all the sweaters looks well made and smooth, but the edges are another story. The sweaters from Koldinghus and Nordiska Museet have knitted edges at the wrists and lower edge, but unfinished neck openings. The young fisherman from Bornholm and Roland Andresen are wearing sweaters with sewn on fabric edges, and Roland’s sweater seems to have a buttonband, also sewn on.
The Icelandic sweater never really went away. I have found it in school photos from the 1940’s and 50’s, newspaper photos from the 1970’s, and it is still popular now. I am working on my version of this classic, and I will write about that in my next post.
Until today, I’ve run a web shop here on Retrofutura. But, there is also one on my other page, Midgaards Have, and it is really not practical. Especially since there was no way to order from both shops and pay just one freight.
So I’ve been working on the solution, and Astrids butik is finally ready now. Astrids butik is the place to order yarns and patterns previously available here at Retrofutura, and in addition all the products from Midgaards Have: patterns, yarns for dyeing, natural dyes, and seeds. And more to come.
This also means that I have closed the shop on this page. Thanks for now, and see you at Astrids butik.
2021 is suddenly over. Another lockdown year gone, but also a busy and good year. For me the year where my pattern, Madrigal, was published in Pom Pom Quarterly 39.
Image from Pom Pom Publishing, Model and art director Lydia Morrow, photography Theodora van Duin, hair and makeup Kala Williams.
The pattern has different levels of repetition.
The most obvious is the color change when knitting a round, alternating stitches of two colors.
But the four colors are also repeated in the same sequence throughout the pattern, and at the same time, dominance is shifted for every 9 rounds.
Together, the multiple repetitions form a whole where no one color dominates over the others. Thus the name Madrigal, which is a type of choral music where voices weave in and out of each other, creating a whole.
Pom Pom’s color choice feels very modern, and it was interesting for me to knit the sample in a color combination so far from what I would have chosen myself! Here is the Pom Pom color combination along with 3 combinations that I chose:
Madrigal in 4 different color combinations.
My eye wants the Madrigal pattern in clear color combinations with a lot of contrast, which honestly belong in the 90’s, the decade where knitting almost died! The feel of the different combinations is truly different, but in the end, the Madrigal design works well in so many 4-color combinations.
All that’s required is 4 colors with good contrast, and that can be achieved by choosing one light, one dark, and two in-between colors. Or, work the pattern in more than 4 colors, without repeating a color sequence.
The pattern itself is an older story. I took it from mittens knitted by a friend of our family, who is in her mid-80’s and has been making mittens in this style for many years.
Here’s two mittens our friend made for my children. The small one looks centuries old, but this is what anything my son has worn for a bit looks like. Sand drizzles out of the small mitten if you shake it gently.
My children’s mittens.
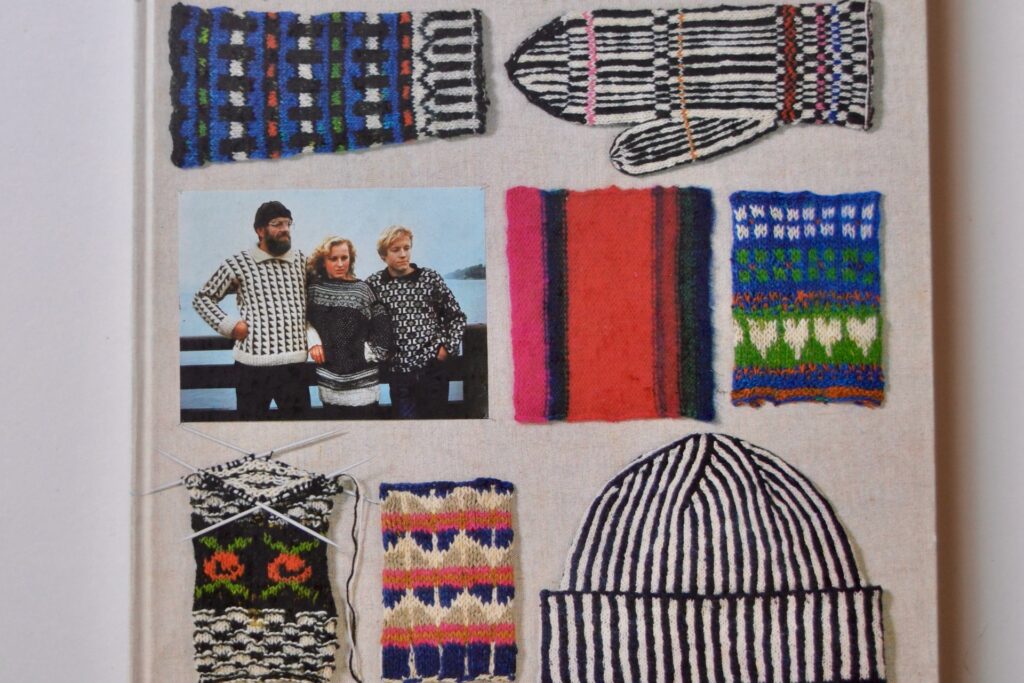
Small repeat patterns on mittens are a part of Danish knitting tradition that has not been given much attention. I wrote an article about small pattern repeat mittens in the Danish knitting magazine <a href=”https://www.gavstrik.dk/medlemsbladet/”>Gavstrik 2021, nr. 1</a>. Here, I’ll just give a couple of examples. One is the front cover of the classic book by Vibeke Lind, Knitting in the Nordic Tradition (1981) where small repeat patterns are seen on the mitten on the top right and the black and white hat at the bottom right.
The front cover of the Danish edition of “Knitting in the Nordic Tradition” by Vibeke Lind.
The Textile Museum in Herning, central Denmark, has a whole collection of small pattern repeat mittens. These mittens were the subject of a workshop series i held last year. Herning was at the center of commercial hand knitting of the 19th century.
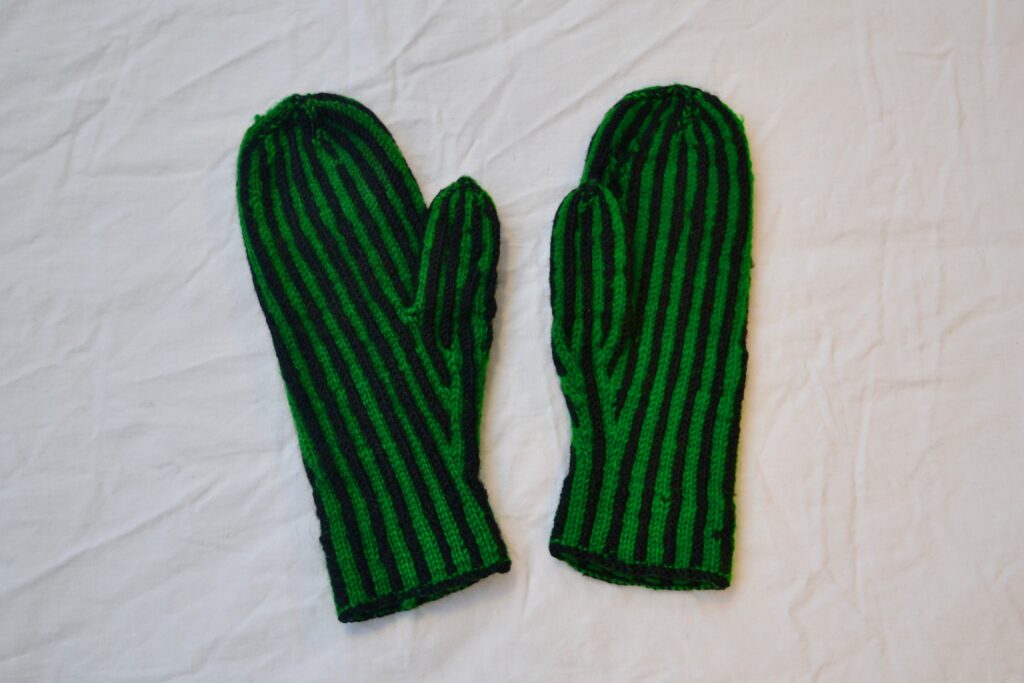
Below are a pair of black and green mittens from Aulum, a small town in the same region of Denmark as Herning. The mittens are made by Kirstine Nyholm, who was born in the 1860’s. In 1886, she married Johannes Nyholm, and they lived in a house with a small field. This comes from the museum registration of the mittens, and the word it uses for their home tells us that they were poor people. The registration also says that Kristine Nyholm always made the mittens this way, and that she gave them to “people and their children”. The mittens are from the late 19th or early 20th century and are a lovely example of small pattern repeats. I am going to knit a copy at some point!
Mittens from Aulum, knitted by Kristine Nyholm for “people and their children”.
Lise Warburg gives a theory about small pattern repeats in her book “The Knitting Madonna” (I don’t know if there is an English translation of this book). She sees it as a relict of an older knitting tradition, twined knitting. Warburhg says that the small repeats come natural in twined knitting.
Older knitting traditions, ones that pre-date the actual knitted artefacts that have been preserved, are difficult to addresss. But it is remarkable that of all the mittens collected in the area around Herning, none have more than two stitches of one color before the other color is used. Is it only in this area, or did it cover a larger area? Nobody has made that study, yet.
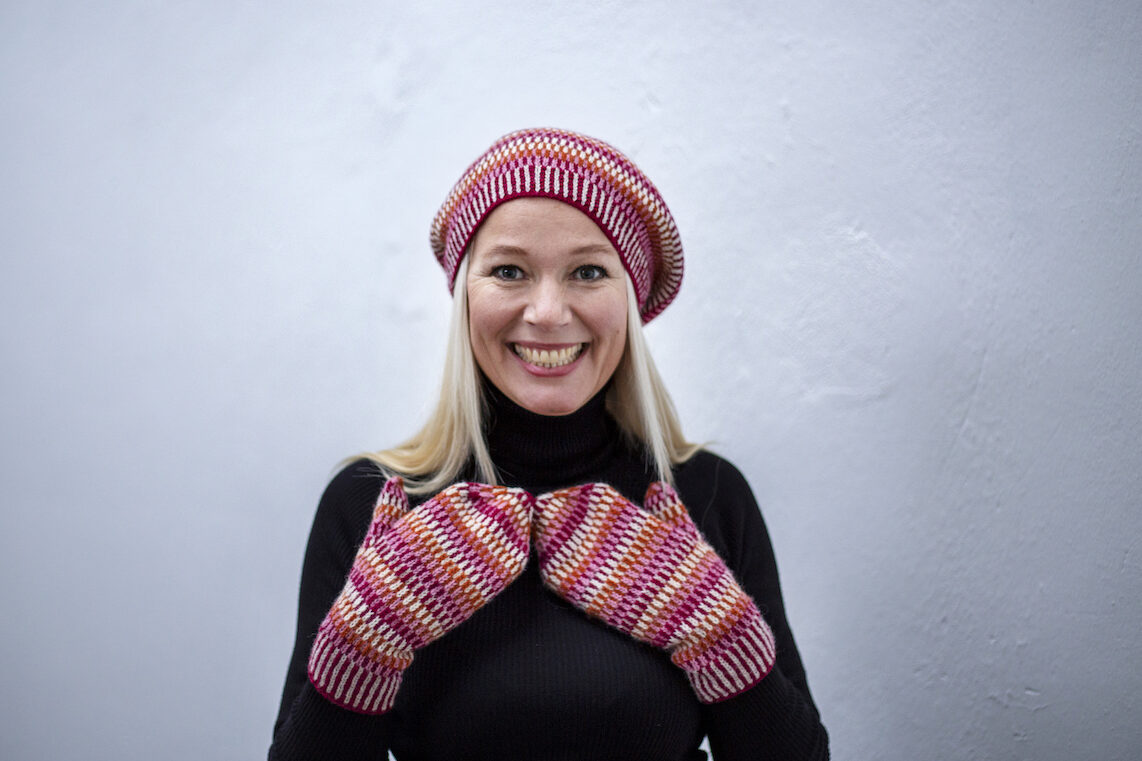
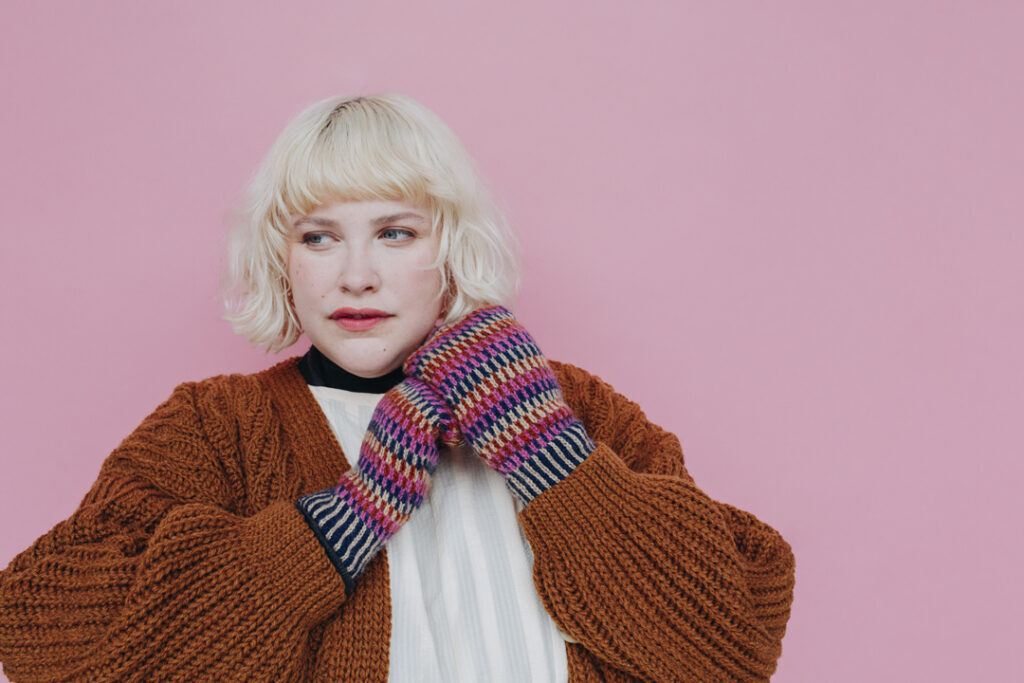
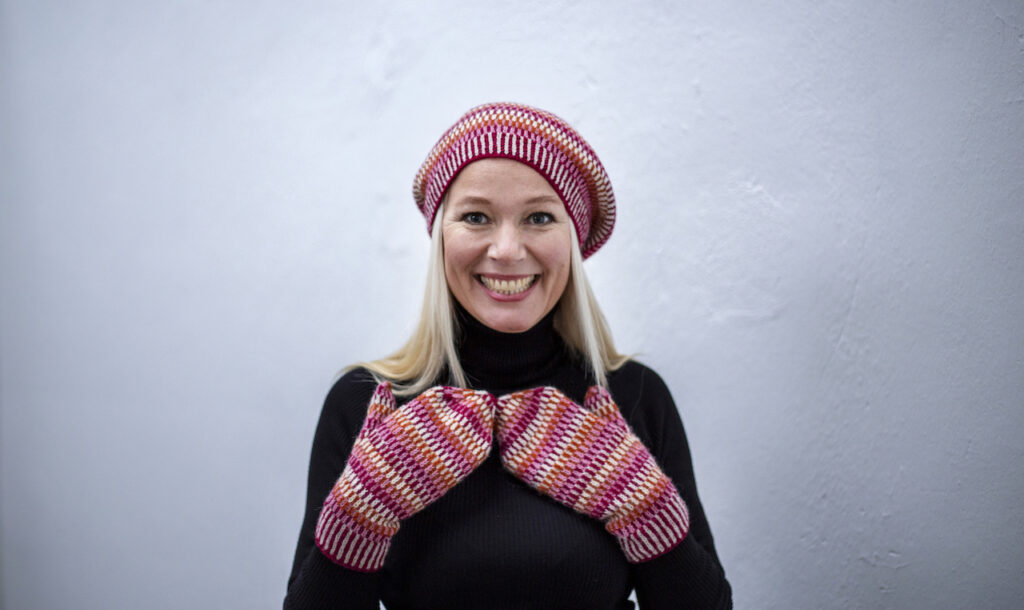
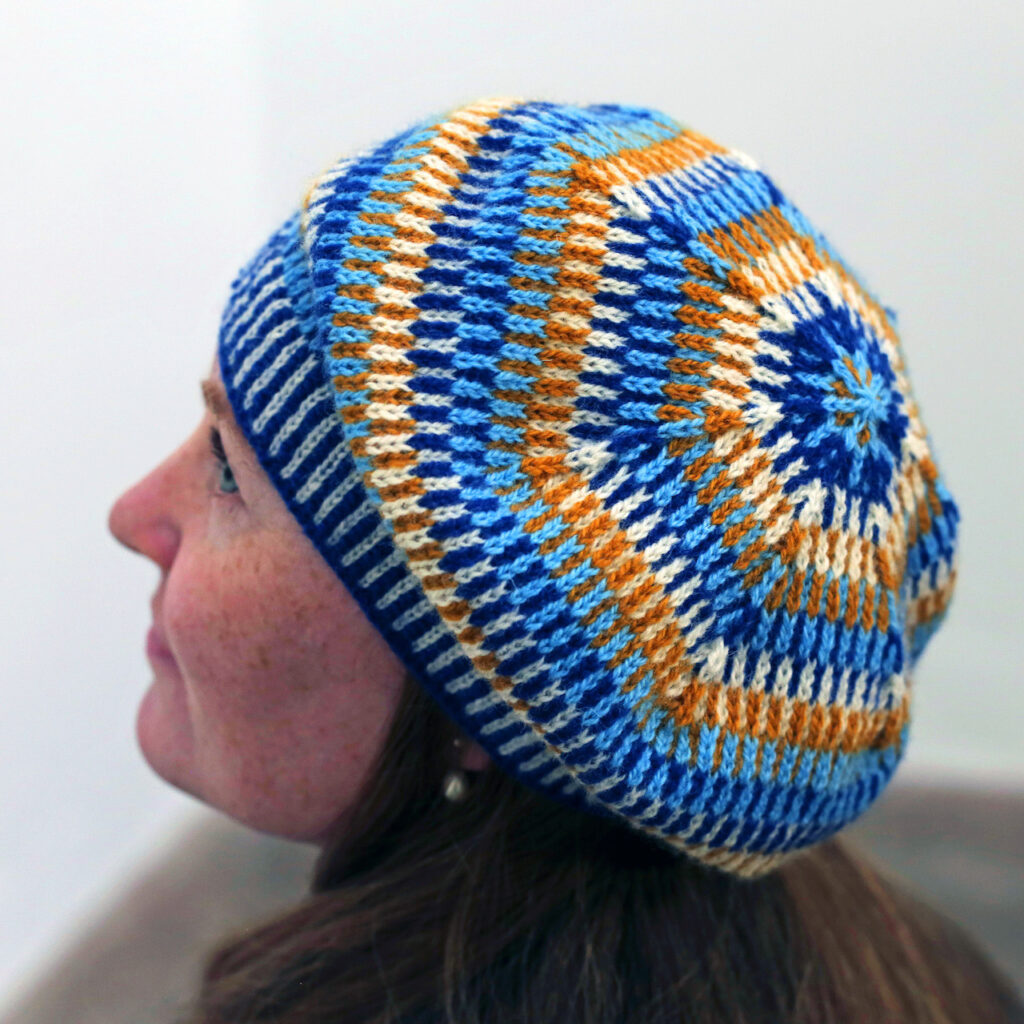
But back to Madrigal. I love having mitten and hat sets, and I mostly grab for the matching sets on my way out the door, instead of using all those hats and mittens that don’t match anything. So I’ve designed a hat to go with the mittens. The small pattern repeat also works very well for a hat. Here is the Madrigal Hat in blue-yellow:
Madrigal Hat in blue and yellow. Model Eva Marie Reng-Andersen, photography Maja Theodoraki.
And here is the set in red-orange
Madrigal Hat and Mittens, red-orange color combination. Model Karin Tuxen, photography Maja Theodoraki.
The Madrigal Set is made with Rauma Finull, with a gauge of 28 sts to 10 cm (4 inches) in stranded knitting. If you have yarn – Finull or another wool that gives the right gauge – and would just like to buy the hat pattern, you will find it here. The mitten pattern can be found in Pom Pom 39, which you’ll find here (update: copyright has reverted to me, and you can now find the mitten pattern here). And kits with yarn in the different color combinations can be found here:
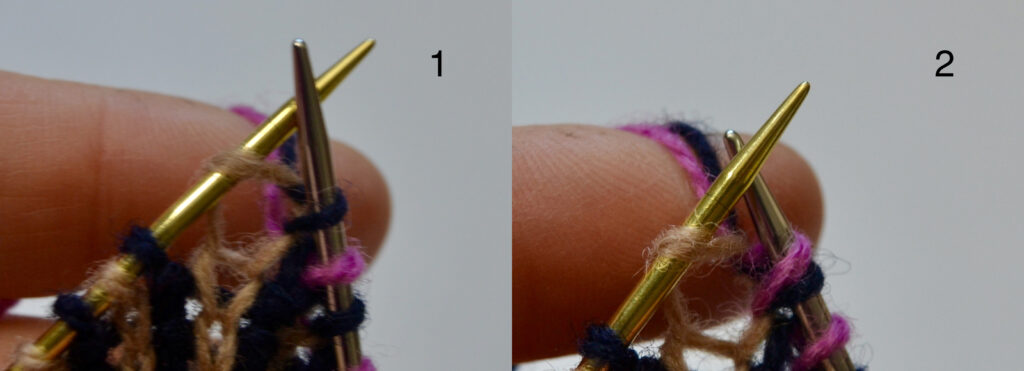
This increase is used in my pattern Madrigal, but would also be useful for other stranded knitting where it fits in. I’ve called it AC-increase because the pattern colors in the Madrigal pattern are A, B, C, and D, and the colors A and C are used for the increase round. A is navy blue and C is pink, and C is the dominant yarn.
The AC-increase is worked by knitting two stitches in one, first a stitch with the non-dominant color A (picture 1), then with the dominant color C (picture 2).
Here, AC-increases have been worked in the last two stitches:
When the stitches are reached on the next round, simply work them one at a time as you reach them. The increase is quite well hidden – the arrows in the picture below point to a couple of AC-increases
Publishing a knitting pattern always makes me happy. This one even more so, since it is the first pattern I publish on this web page, and it is a pattern that I’ve been thinking about for a long time!
Some years ago, when I lived in France, I visited my aunt, who lives outside Paris. We spent Christmas and New Year’s together, talking a lot about many things, including my grandmother – her mother – Judith Harvest.
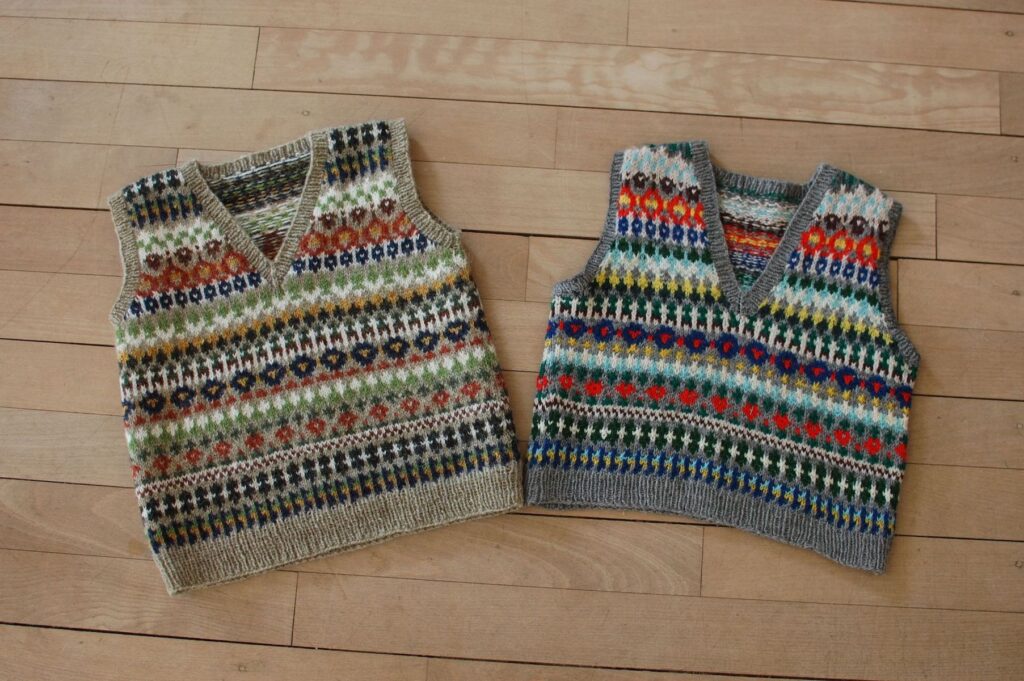
I have mentioned Judith Harves before on this page, and also the small stranded vest that she knit during the first half of the 70’s. When I visited my aunt that Christmas, she let me have the small vest that had been sitting in her attic for many years. That became the beginning of a much larger project for me. Here is the original and an almost-copy that I made:
The child’s vest from the first half of the 70’s. Judith Harvest’s original on the right and my heathered version on the left.
The vest is interesting because its patterning does not belong to one single knitting tradition, but incorporates elements from several different traditions.
Judith spent all of World War II in England, where strict rationing of yarn and clothes were in place. Before the war, in the 20’s and 30’s, Fair Isle knitting became hugely fashionable. The fancy Fair Isle garments were very colorful, but the colors were coordinated and used in patterned bands that were repeated.
Wartime knitting became extremely colorful. In many cases, it was not hard to tell that the colorful expressions were a necessity because of scarcity. Seen from the present, some of the wartime knitting is just beautiful, for example the cardigan at the bottom of this post in Susan Crawford’s old blog. The colors never repeat, but are visually held together by repeating the same pattern throughout.
Judith never let odds and ends of yarn go to waste, and a lot of garments that she made during the 60’s and 70’s are made largely with leftover yarns knit in Fair Isle-type patterns, sometimes with clear Scandinavian influences. For example, I’ve seen some of the small geometric forms from the Memory pattern in patterns from Norway.
A radical new knitting style emerged in Denmark in the 70’s – “hønsestrik”. The direct translation of the term is “chicken knitting”, a comment directed at the men at the “Red rooster” publisher who had rejected publication of the book that detailed the new knitting. Chicken knitting was an often chaotic mix of colors and shapes, rebelling against “big yarn” and its control of individual creativity.
I’m quite sure that Judith immediately recognized the creativity of chicken knitting, and she used elements of it in her own knitting during the 70’s. I also quite sure that she did not approve of its political messages.
The patterns from little vest became much less chaotic in my Memory Vest, since I’ve limited the colors, only using a limited palette. I decided on the name Memory Vest because I found a photo in one of Judith’s albums where my cousin is wearing the little vest. The picture was taken during a trip to England in 1975 where they visited the small town Watlington (in Norfolk).
Judith spent most of WWII alone in Watlington. Her husband, William Wildman, was killed in 1940, and his namy is seen on the monument. On the second photo, my cousin is leaned against a stone that bears the words “In Memory” and wearing the vest.
A page from Judith Harvest’s photo album, 1975.
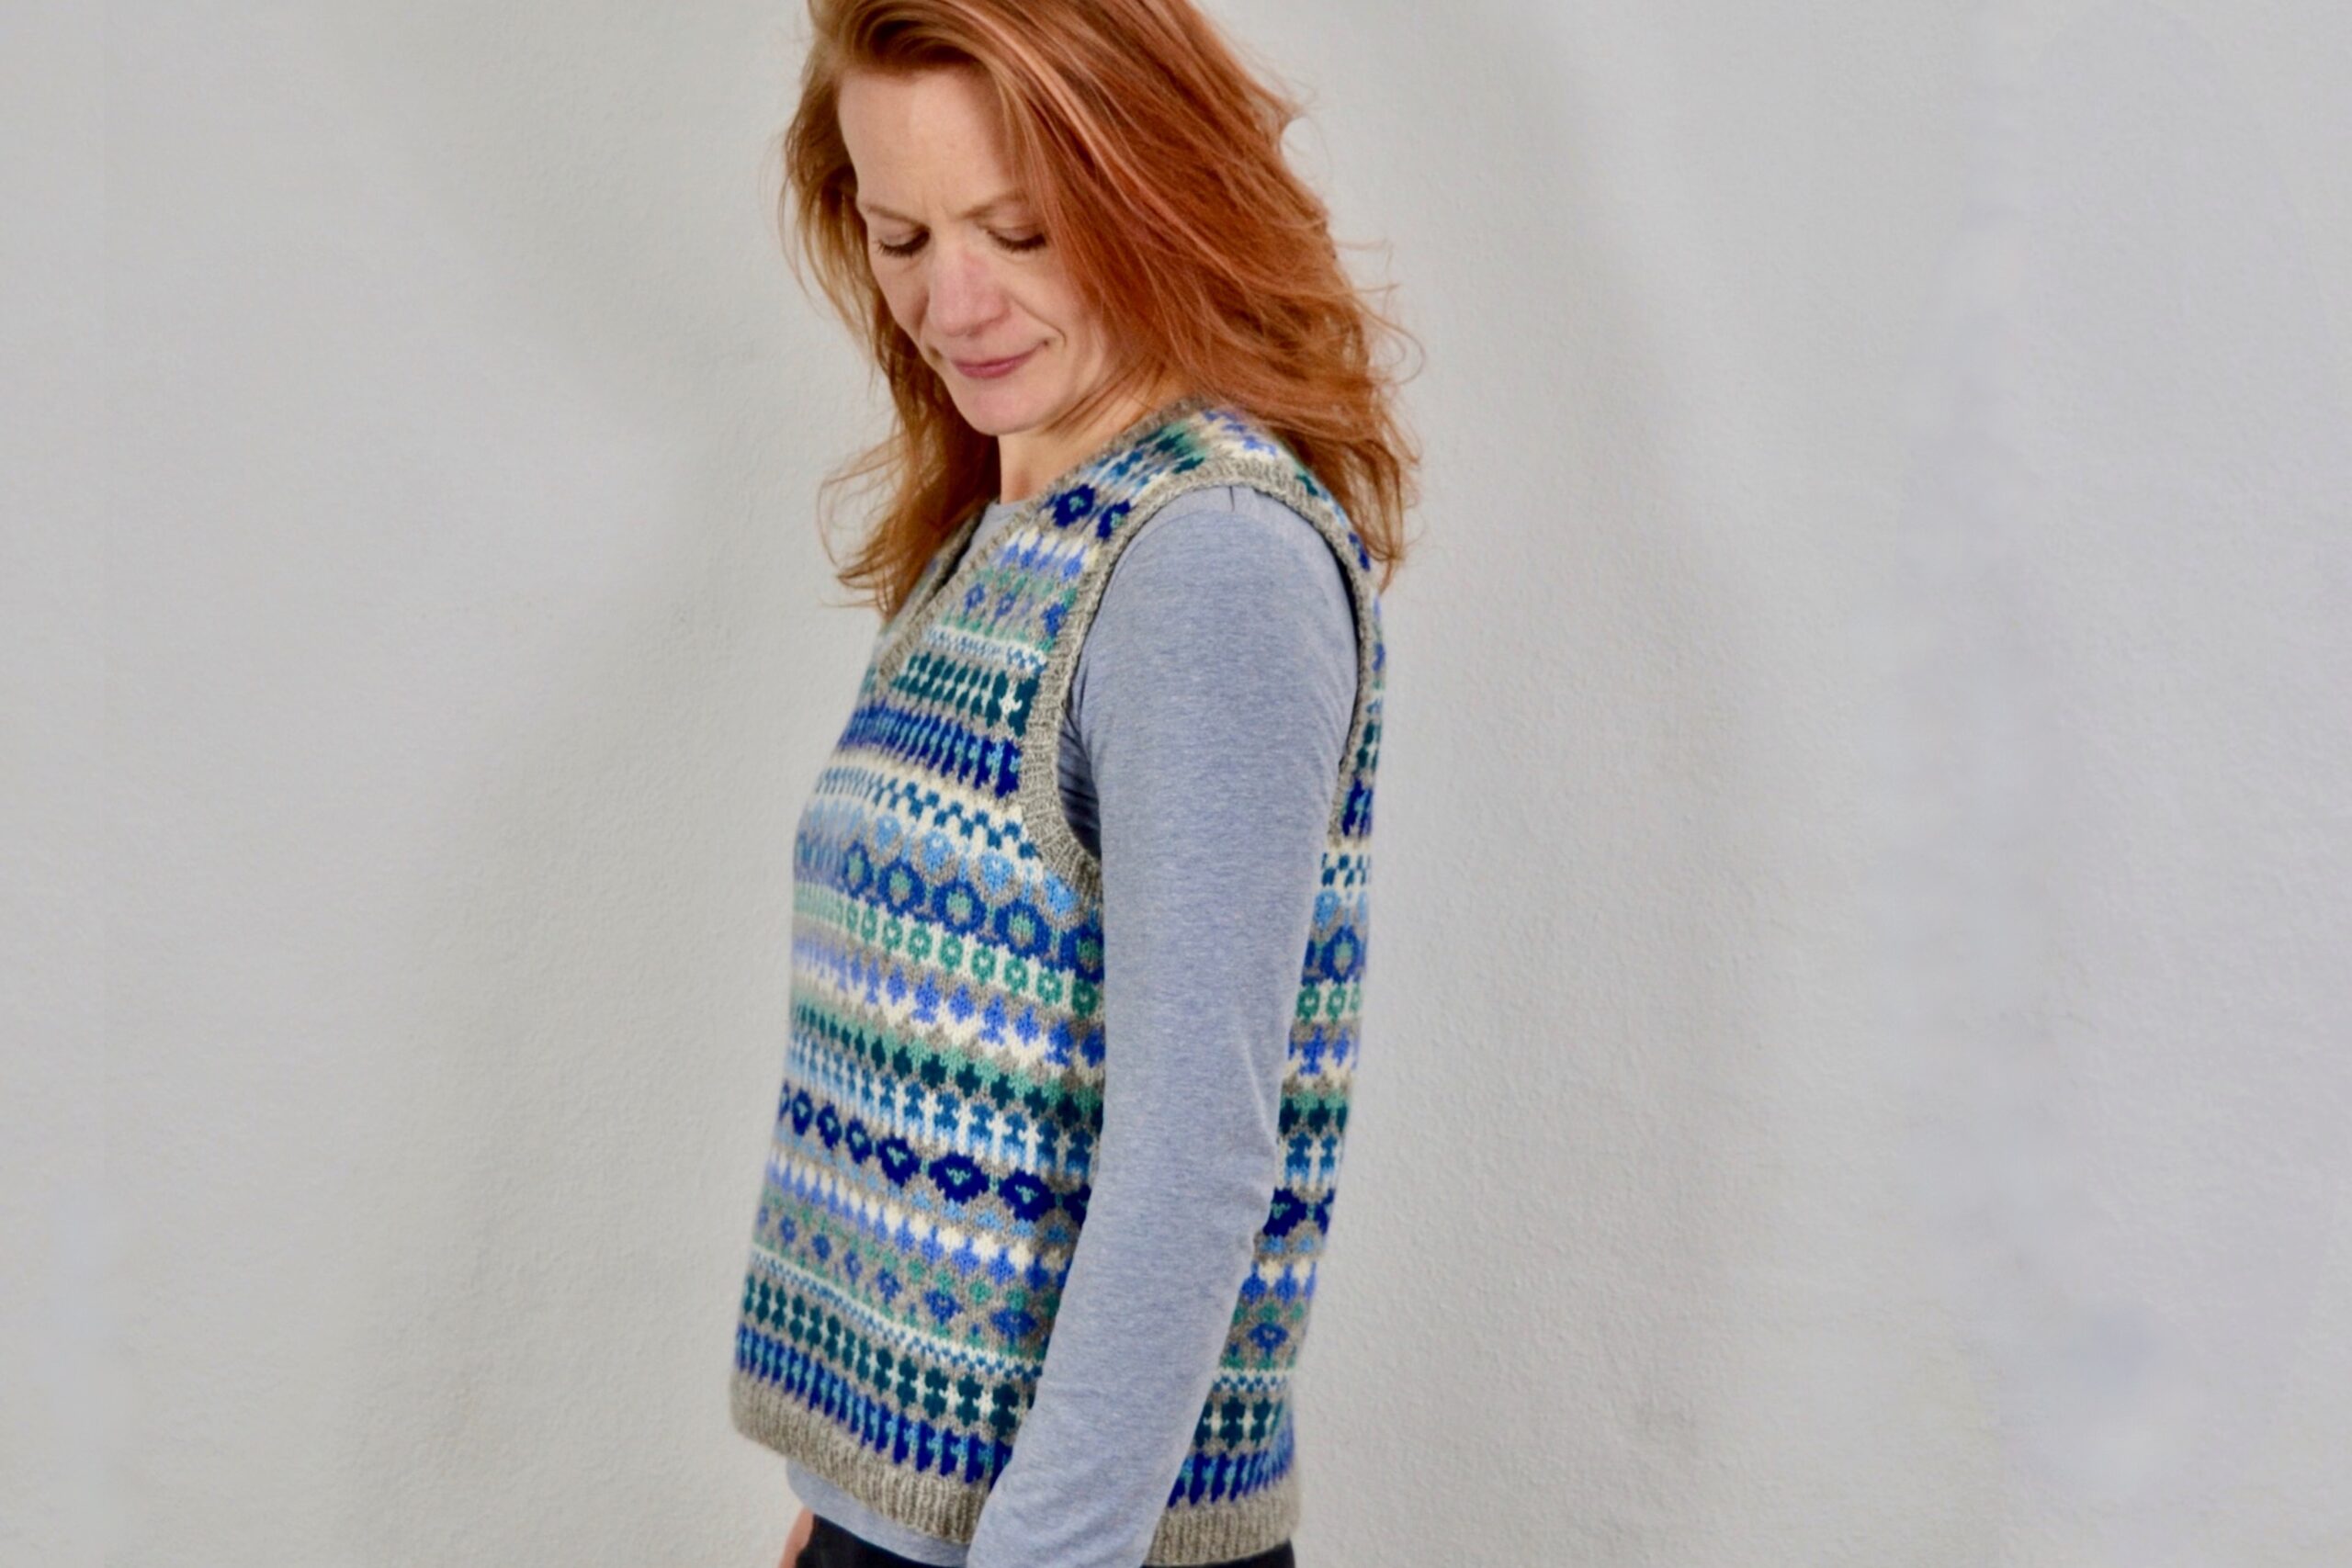
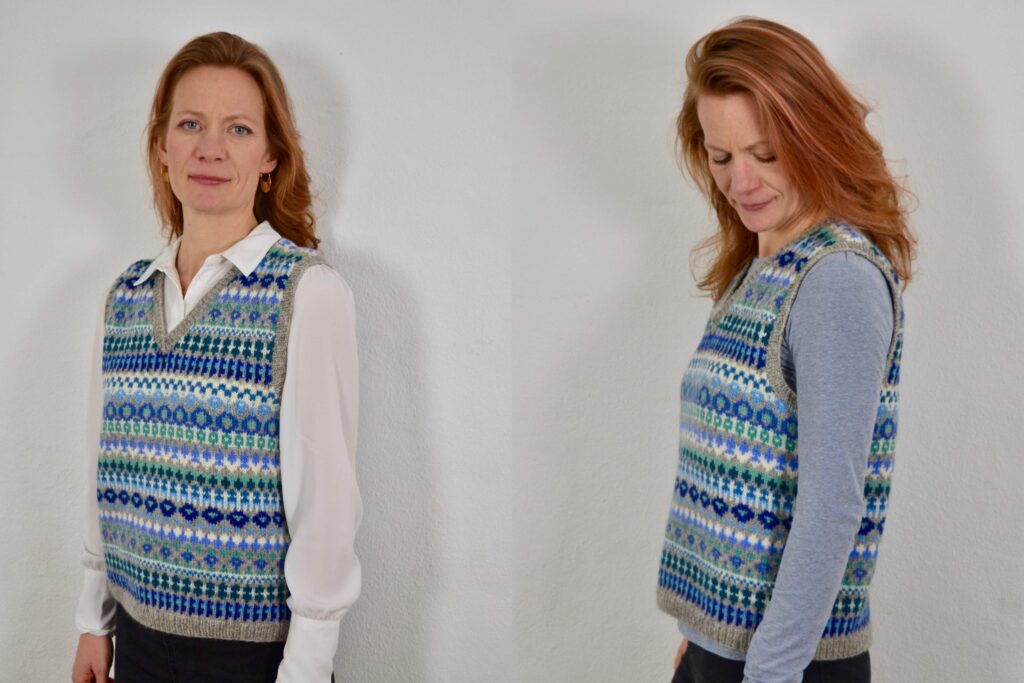
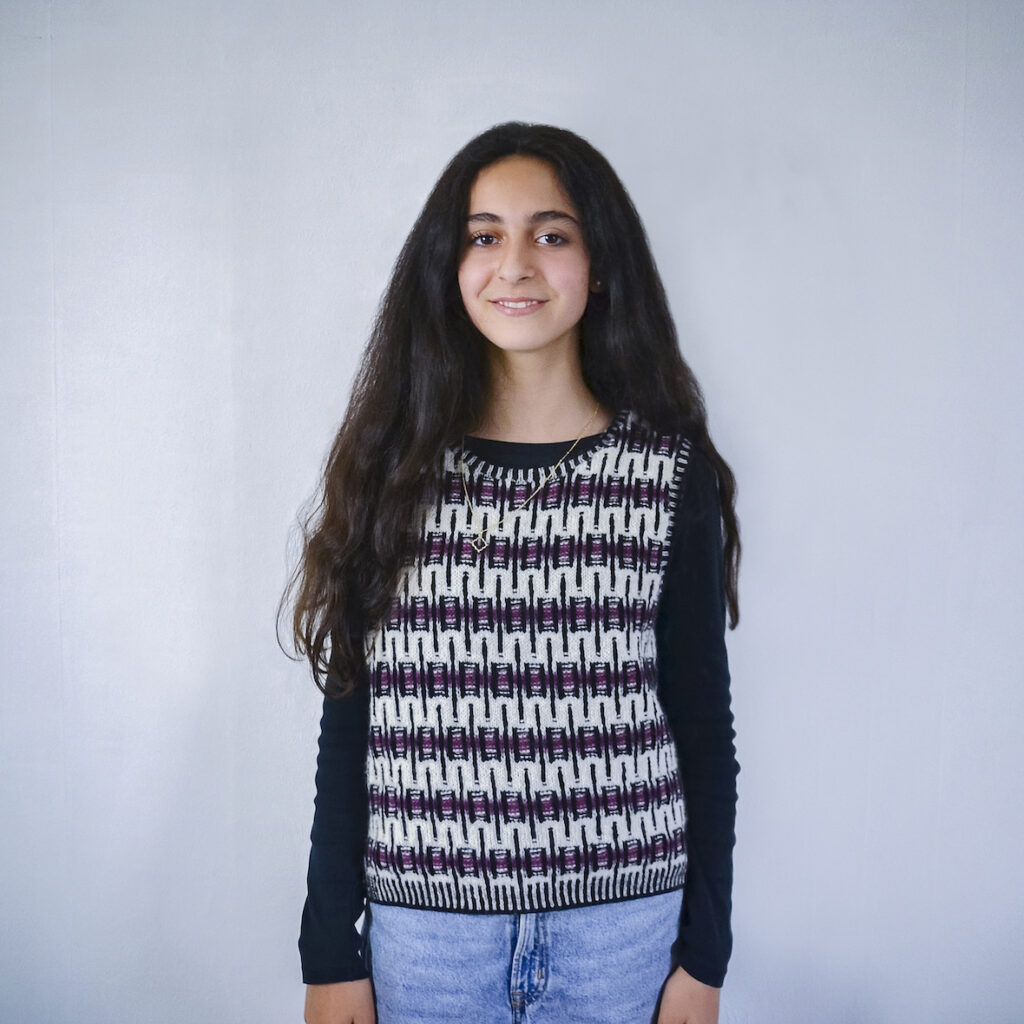
I decided to make my version of the vest in women’s sizes, and the pattern has 7 sizes from XS to 3X, with a finished chest measurement of 83 to 147 cm (32 3⁄4 to 58 inches). Here, my sister is wearing the pink version with a white shirt under, the most classic of vest looks
Memory Vest, the pink version
Being a redhead, she obviously went for the pink version (what is it with pink and redheads?) although I had planned for her to wear the blue one! But we managed to get pictures with the blue version too, both with the classic white shirt and in a casual version with a long sleeve tee under
Memory Vest, the blue version
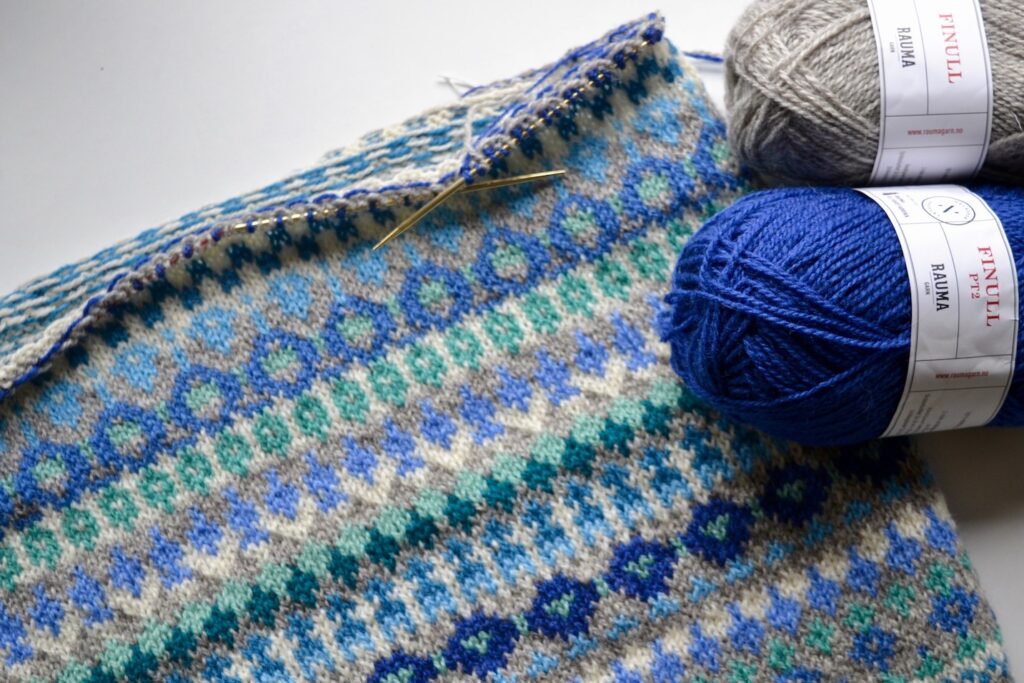
The Memory Vest is knit with Rauma Finull, which is an excellent yarn for colorwork. Because it comes in so many colors, but also because it blooms nicely when washed, holding together the knitted fabric. The vest is steeked, and when knitting with Finull, it is not necessary to reinforce the steeks, the steek stitches themselves and the picked up edges hold together just fine.
I have put together kits for the Memory Vest, in three color combinations: blue, pink, and green. You can find them in our online store:
It is also possible to buy the pattern only, you will find it here. You can of course work the vest using other yarns than Rauma Finull. Finull is 175 m / 50 g (191 yards / 1.77 ounces), and the vest is worked at a gauge of 25 stiches x 27 rounds = 10 x 10 cm (4 x 4 inches). It is possible to use a more slippery yarn, but then it is wise to reinforce the steeks with a couple of machine seams before cutting.
I’ve been working on a modern version of a child’s vest, knit by my maternal grandmother during the first half of the 70’s.
My maternal grandmother, Judith Harvest, was born in the northern Danish town of Aalborg in 1908. In so many ways, she is my entry point into historical knitting. Although she died when I was little, I grew up with her knitting. And of course, my mother taught me everything in knitting that her mother taught her. I am currently working on finding out more of my grandmothers’ story. So this is definitely not the last time she will be mentioned on this page.
I first tried knitting the patterns from the small vest in 2014:
The child’s vest from the early 70’s. Judith Harvest’s original on the right and my muted version on the left.
Now, I’ve dug up my notes on the vest, and I’m going to turn them into an actual knitting pattern. It will be called “Memory Vest” and will come in women’s sizes.
The colors of the original are both garish and somewhat uncoordinated. And that is not a criticism – it just goes to show that my grandmother grabbed into her yarn basked and used whatever came out. She did not plan patterns out beforehand. Look at the large red and yellow pattern band on the top part of the original. It is not centered around the V-neck, that’s what happens when you just knit! She must have thought that it was not a big problem.
My first adult version of the vest is in cool aqua shades with a light gray background. I am knitting it with Rauma Finull
And that finally brings me to the topic I was actually going to write about in this post: how I close shoulder seams using a 3 needle bind off. It is basically a variation on the standard bind off (or cast off, whatever you like to call it) where you knit 2 stitches and pass the first over the last, knit one, pass over, and so on.
In a 3 needle bind off, two stitches from two different needles are knit together (instead of just knitting one in the standard bind off). The 3 needle bind off allows you to knit two pieces together with a strong and slightly elastic join, perfect for a shoulder seam.
When the body is finished, I turn the work inside out. Here, the stitches for one shoulder are held, the front and back stitches each on their separate needle (or actually two ends of a circular needle in this case).
A third needle is inserted through one stitch from each of the two needles holding the stitches – the first stitch on one needle and the front stitch on the other
Then, the two stitches are knit together
Repeat for the next two stitches, that leaves two stitches on the right needle
Just like in a standard bind off, pass the first stitch (that was worked first) over the last
One stitch was bound off. Then, knit together the next two
And pass the previous stitch over. Keep going, knitting two together and passing the previous stitch over, until all stitches have been worked
Break the yarn and pull the end through. The bind off is finished.
When I worked my blue version of the Memory Vest, the stitches to be bound off in shoulder seams were all grey. If you find yourself needing to 3 needle bind off color-knitted rows, the best thing is to work in the color of the stitches, holding the yarns in the same way as when doing colorwork. The yarn used for the bind off will show just slightly on the right side.
Corrugated ribbing is a classical element of Fair Isle knitting. In corrugated ribbing, the knits and purls are worked in two different colors using stranded knitting.
I’ve searched through my books on Shetland knitting to try to find out when corrugated ribbing became such a central element. But none of my books comment on that specifically. In Alice Starmore’s “Book of Fair Isle Knitting” there is a photo of the earliest known Fair Isle hats, from around 1850. They are covered in OXO pattern bands, but none of them have corrugated ribbing.
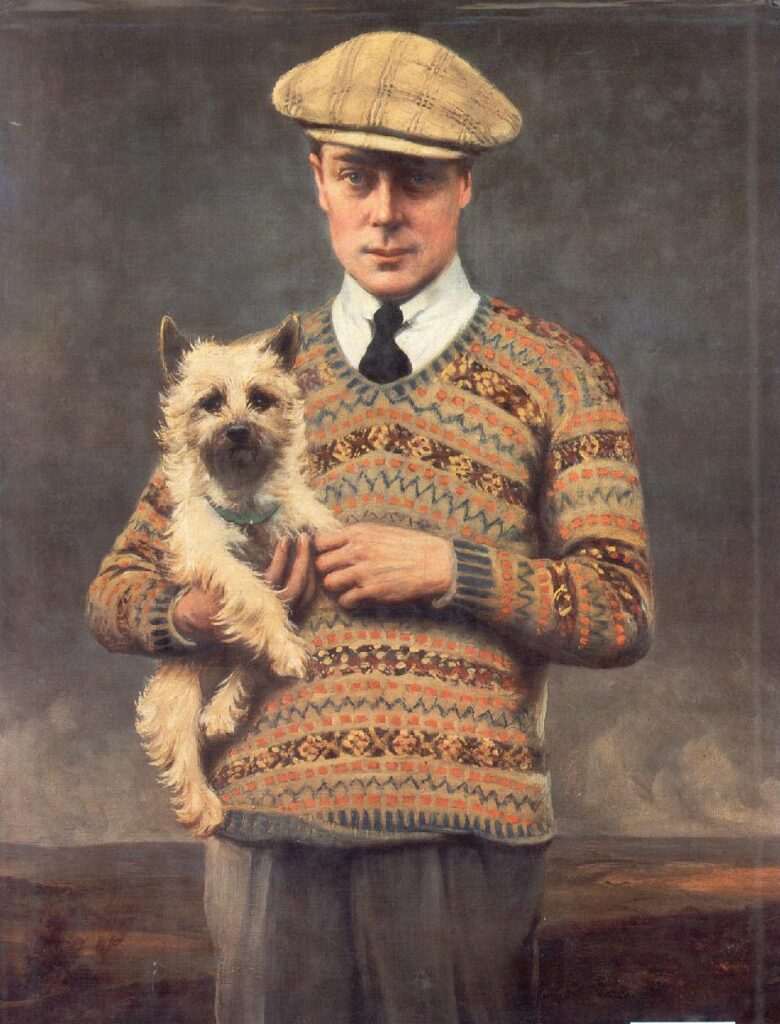
On the knitting famous portrait of the Prince of Wales (later Edward VIII), painted by John Lander in 1925, the prince’s sweater clearly has edges in corrugated ribbing. It also has OXO bands throughout, painted so clearly that you can almost knit them from the painting! It is said that the golfer prince started a new fashion by showing up in this outfit (knit sweaters used to be for poor workers and fishermen). But more on that some other time – here, I’ll just use the prince to say that corrugated ribbing seems to have emerged between 1850 and 1925.
The Prince of Wales, later Edvard VIII, sporting a Fair Isle jumper and holding his favorite dog. John St Helier Lander, Public domain, via Wikimedia Commons
Corrugated ribbing is a wonderfully decorative element, but it does have some fundamental structural flaws. Unlike true, 1-color ribbing, corrugated ribbing is not the least elastic. But that problem can be solved by:
using the same number of stitches for your corrugated ribbing as for the rest of the garment.
That is different from a garment with normal 1-color ribbing and stockinette, for example. In that case, my rule of thumb is:
use 10% fewer stitches for the rib than for the rest of the garment.
But a deeper problem with corrugated ribbing is this: it is tighter than a normal cast on (by normal, I mean a long tail cast on). So if you were to cast on normally and then work corrugated ribbing, the cast on edge will stick out and the rib will never lie flat. The solution is to use another type of cast on. I find the old Norwegian (also known as twisted German) cast on works well.
I first saw the old Norwegian cast on in action when I was teaching children to knit at the Textile Museum in Herning. I was working with Gerda, a volunteer who is in her 80’s. We cast on the stitches for our knitting students, since it is hard enough for them to just knit the stitches. I saw Gerda cast on stitches for a student, and I was quite surprised that her standard cast on technique was not the same as mine. I later connected the dots, and realized she was using the old Norwegian cast on. So that technique must have been in use in this area as the standard method.
The old Norwegian cast on can be used anytime you would use a long tail cast on, but it’s moment to shine is for corrugated ribbing.
Here is a video where I show the old Norwegian cast on:
In the last part of the video, I turn the work around. The side that faces away from you as you cast on has a row of bumps that look just like purl bumps. Before beginning the corrugated ribbing, I turn the work so the bumps are facing me: the bump side is the right side. And then it will look like this:
Here, I’ve used the simplest possible corrugated ribbing for the edge of a vest in my own pattern, Folkvang. I began with an old Norwegian cast on in white, and you can just make out the bumps.
The pattern for the Folkvang vest will come later. The vest in the photo above was my prototype, but something bad happened to it when it was almost finished. I had it in my knitting bag in my car, along with a thermos full of tea. The thermos tipped over, the vest was soaked in tea, and the spot covers about half the vest and does absolutely not come off. Right now, I’m knitting something else to get over that event. But I’ll return to that design as soon as I find the mental strength.
Steeking is a great technique for stranded knitting (also known as Fair Isle knitting). With the addition of steek stitches, a vest, sweater, or cardigan can be knitted entirely in the round, then cut open. So then, you don’t have to knit flat in stranded knitting, and that’s a major advantage. Purling in stranded knitting is notoriously difficult.
Some knitters are afraid of cutting their knitting. Me, I love it! It’s not dangerous, and as long as you use a suitable yarn type, there is no risk that the cut stitches unravel.
By suitable yarn type, I mean a Shetland-type wool, Rauma Finull, or Retrofutura 2-ply Lambswool. All are “sticky” wools, where the strands of wool slightly adhere to their neighbors. Even with unsuitable yarn types, steeking is still possible. In that case, just make two machine seams along the steek and cut between them, that will completely eliminate the risk of unraveling.
Here, I’ll show how to cast on for a steek using a backwards loop cast on with alternating colors. I’ve taken the photos while knitting a Folkvang Vest (pattern to come later) where the body is worked from the bottom up. Here, I’ve saved stitches on waste yarn for the underarm, and I’m ready to cast on the steek stitches:
First, I cast on a black stitch – it’s not hugely important which color you begin with, I chose black to make the float on the back as short as possible:
Then, I let the white yarn cross over the black yarn and cast on a white stitch:
Let the black yarn cross over the white yarn and cast on a black stitch:
Let the white yarn cross over the black yarn and cast on a white stitch:
And so on! The yarns are twisted for each stitch, reinforcing the cast on edge. Here, I’ve cast on 8 steek stitches, my usual number:
I usually place markers around the steek stitches. Otherwise, I easily get confused by all the color changes, especially when making decreases around the steek stitches.
Astrids butik is my shop, and the place to find all yarns and patterns connected to the project Retrofutura. It is also the place to find all products connected to the project Midgaards Have – natural dyes, yarn for dyeing, seeds. And a growing selection of other yummy yarns and knitting design